


If you’re curious about making a plaster of Paris cast, you’ve come to the right place. We’ve been experimenting with this great medium lately and picked up plenty of tips along the way. Below are just a few to get you well on your way to bringing your cast to life.
1. Safety first
We touched on this on our previous plaster tips article, but it’s worth another mention. Look after yourself and always wear a dust mask and latex gloves when you’re working with plaster of Paris.
2. Making the master

The first step in plaster casting is to create a master to make your mould from (this is also called a plug). A ‘master’ is basically the original sculpture that will form the shape of your mould. You can create this from wood clay, modelling clay, wax or polymer clay.
3. Creating the mould
Once you’ve made the master sculpture you will need to coat it in a release agent to stop the plaster mould from sticking to it. There are plenty of release agents on the market, but a good DIY option is to mix petroleum jelly with white spirits. Put the petroleum jelly into a deep dish and then slowly add the white spirit until it thins to the consistency of cream. Once that’s done, paint it onto your master using a soft brush.
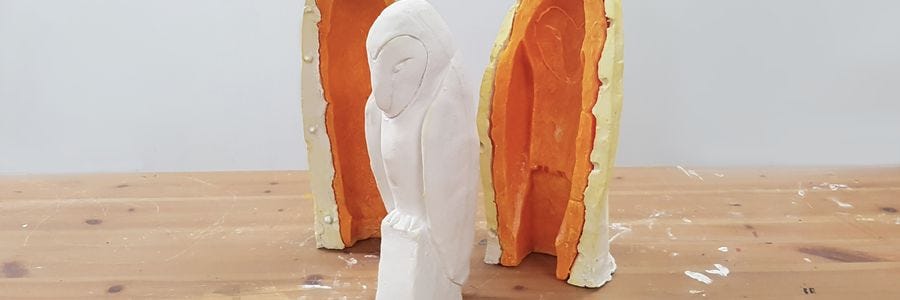
4. Choosing the right mould

There are 3 main types of moulds that work in different ways: a waste mould, a single piece mould and a multi-piece mould. The type will depend on the material you have used for your master and the number of casts you need. Below is a quick rundown of each one.
Waste mould: A waste mould can only be used once and is suitable for a soft master that’s made from a material like wet clay, modelling clay or wax. Once you’ve cast your sculpture, you will need to chip away the waste mould with a chisel.
Single piece mould: A single piece mould is ideal for simple sculptures that are flat on the back (such as a relief piece). To create a single piece mould, you will need to apply a release agent to your master, build a wall around it and pour plaster on top of it. This type of mould can be used multiple times.
Multi-piece mould: If you’re creating a more complex sculpture, you’ll probably need to make a multi-piece mould. This mould will have two halves, which you will need to hold firmly together when pouring your cast, and can be used over and over again. If you’d like to learn how to create this type of mould, check out our plaster owl tutorial.
5. Pouring your plaster
Your plaster of Paris is ready to pour once it has the same consistency as pancake batter (roughly 3 parts plaster to 1 part water). Pour the plaster into the deepest part of the mould and tap the side as you go to release any air bubbles. Let the cast dry for 1 hour (minimum) before you take the mould off.
6. Cleaning the cast

Cleaning up the cast is referred to as ‘chasing’. If there are any rough bits of plaster on your cast, for example from the mould joins, you’ll want to remove these before the cast has fully dried. Use stainless steel modelling tools to remove and tidy up any bits of plaster that shouldn’t be there. When the cast is completely dry (this usually takes roughly 3 days), you can use a fine or medium non-clogging sand paper to smooth out any remaining rough patches.
7. Finishing touches
Once your cast is dry, you can either leave it with a natural plaster surface or paint it. Since plaster is extremely porous, you will need to seal the surface with a coat of acrylic paint before you add your colours. This will help give your final coat of paint a consistent all-over gloss level and make your colours more vibrant.
8. Caring for your plaster mould
If you look after your mould, it can last for years and provide cast after cast. The best tip we can give you is to keep your mould away from moisture and in a cool, well-ventilated area. If you have a multi-piece mould, you should keep the pieces bound tightly together to stop them from being damaged.
If you’d like to see a cast in action, check out our plaster owl tutorial. We’d love to see your creations, so don’t forget to tag us on Facebook or Instagram using @montmarteart.


