


Painting realistic animals can be daunting and a little challenging to get the hang of, but you’re not alone on the journey. We asked realistic wildlife artist and friend, Dawie Mocke (@dawie_mocke_wildart), for his top 14 tips for painting realistic animals with acrylics, to help along the way.

1. Think about what animals you’ll paint
If you’re looking to sell your work, it’s also helpful to know what the market wants. That first step was easy for me because I found my niche in wildlife and started specialising in it. However, later I found that not all animals are popular, so try sticking to themes or animals that could potentially bring in an income -- unless it's a commissioned work. You'll spend the same amount of time painting a lion versus a caterpillar, but you'll have 100 times more potential buyers for the lion than the caterpillar. So carefully choose your subject because time is money.
2. Planning the composition
When it comes to painting realistic animals, it will help to keep the rules of composition in mind, this will draw the eye to the focal point in the work. In these tips, I’ll share how I use the rule of thirds, halves and the golden triangle theory.
Rule of halves
Here the image is divided in half and then half again, so if we imagine a vertical line and a horizontal line across the artwork, the focus is still on on the middle.

Rule of thirds
For the rule of thirds for instance, try having three horizontal lines in the background and two lines on your subject. I've chosen my painting, Through the Never here to show you what I mean. 
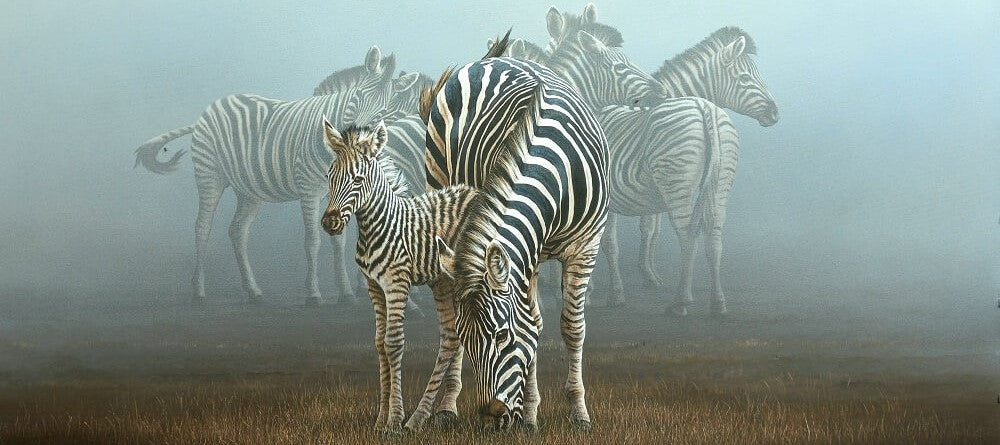
Golden triangle
In this painting below, I also used the rule of the "Golden Triangle'' to pull the eye to a focal point in the bottom half of the painting. The top half, I kept misty to add a feeling of space and mystique. Not only will the Golden Triangle theory help you with your paintings, but you can also call yourself a kind of quantum physicist by throwing around terms like "Golden Triangle,” … somewhat...no not really 😂.
3. Planning the background

Regardless of whether you’re painting realistic animals or people, it’s important to know where you want the painting to go before starting. This will help to create a certain feeling and help you work towards the final image in your mind's eye. First, I start with the background, where I paint rough, broad, brush strokes to get the balance and plan where I want to use different colours.
4. Softening brush strokes

Next, I use an airbrush to soften the brush strokes in the background. If you’re using an air brush, remember to water down your acrylic paints to a 50/50 ratio, this will get the paint through the needle-sized nozzle of the airbrush. It also helps wearing a Christmas hat during this process.
5. Plot your subjects
Plot the outlines of your subject on the canvas. Here, I kept the zebras in the bottom-half of the canvas and left the top half open. These zebras will make up the background for now and I’ll add in the main subjects later.
6. Layer

I work with a lot of layers when painting realistic animals, layering over and over, until I get a solid image. I use Titanium White to fill in the subject and then overlay the white with watered down colour to keep the image transparent. In this example, I created an overlay with Burnt Umber over the White. I repeat this process using umbers and ochres.
7. Adding details to the background subjects
With the subjects in, it’s now time to paint the background subjects in a lot of detail. Some might call this done, but in my mind's eye, this is not where I want to be at, so the creativity continues! I use Paynes Grey and Raw Umber to add the shadows.
8. Adding depth of field
Next, I need to form a juxtaposition between the main subject and the background. To push the zebras into the background more, I airbrush a mist with white and Sky Blue over the entire canvas. This creates a 'depth of field” to the painting. Depth of field is also a photographic term, makes me sound clever. 😊
9. Positioning the main subjects
Now we have the background sorted, it’s time to add the main subjects. Positioning the main subject in the correct place is key to getting the balance of this painting. Here, it has to be in the bottom half of the painting, if we want to complete the "Golden Triangle" rule, (the main subject with the background zebras will form part of the triangle). Most of the work is done in the bottom half to keep the 1/2 rule - I don't want to lose the feeling of space and freedom this painting is intended to give.
10. Adding colour
Again, I paint the subject with thick Titanium White to make it a solid colour and separate it from the background.
11. Layer again
The same technique of layering applies here again, with a lot of layers again using Umbers and Ochres. Layering is important for not only painting realistic animals, but it also gives a softer and complete look when seeing the artwork.
12. Add the final touches
Now it’s time to add some more touch ups. I’ve added more details to the grass and shadows on the mum and baby zebra here. Don’t forget to sign your masterpiece!
13. Enjoy your masterpiece
Looking back at this painting, the three-week effort really pays off. The rule of thirds works in the background, the rule of halves works on the subjects and the eye is drawn to the mother and the baby zebra, following the golden triangle theory. This is a painting I'm proud of and it gives me the courage to create more exquisite and awesome art.
14. Dip into different styles in between

Even if your focus is on painting realistic animals, try also painting animals in different styles when you have free time. Try alla prima, impressionism or even abstract when you have a spare moment or two, this will keep you sane and keep up your passion for creating.
PEACE AND LOVE, Dawie Mocke.
About

Dawie Mocke is a realism artist living in South Africa. His work features the wildlife of South Africa and his photo realistic style is completely self taught. You can find more about Dawie Mocke and his creative journey here.
We hope that you feel inspired to start painting realistic animals too. Try some of these tips for yourself and #montmarteart or tag us @montmarteart on Instagram or Facebook, we’d love to see what you create.


