


Dotted painting looks great on your wall and doubles as a relaxing mindfulness activity. We recently gave it a go and learnt a lot along the way. If you’d like to create your own dotted painting, check out our top tips below and get started!
1. Prepare your canvas
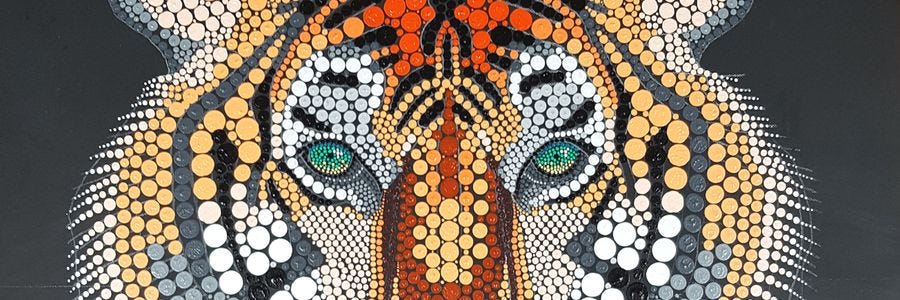
First things first, let’s get your canvas in order. If your canvas came with wooden wedges, put them into each corner on the back to make the surface even and tight. Next, paint on a dark background so that your dots will really stand out. For our tiger painting, we used black chalkboard paint to make it easy to draw on the outline and so that the black dots could be seen against the slightly lighter, matte shade of black.
2. Select an image

When you’re choosing your image, look for one that has good symmetry. This will make it easier to plan and generally looks more balanced in the end.
3. Create the outline
Drawing the outline on your canvas is an important step because it will guide your dotting. We’d suggest putting tracing paper on top of your image and drawing the key areas.
4. Draw the outline onto your canvas
Use a white charcoal pencil and ruler to draw up a vertical and horizontal line that breaks up your canvas into 4 parts. This will make it easier to get your symmetry right. Next, copy your simplified tracing paper drawing onto a canvas using a white charcoal pencil. You can remove any mistakes with a damp brush or cloth.
5. Create a colour guide
There’s just a little more planning to go before we get started, but you’re nearly there! Create a limited colour palette and put a colour in each segment of your original traced drawing so that you can use it as a guide.
6. Dotting tools

This is where a little bit of experimentation comes in. Whatever you end up using for your dotting, make sure it has a flat, round end. For our painting we used drill bits, the end of a hobby knife and the ends of cut off paint brushes.
7. Dotting method
The trick for creating clean dots is to dip the end of your tool into the paint and don’t press all the way down when creating your dot. Gently apply the paint, almost touching the canvas but not making full contact with it. This will make sure you don’t pull any of the paint back up off the canvas when you lift your tool.
8. Colour transitions

It’s likely that some areas of your artwork will need colour transitions. Since dotted painting doesn’t allow you to blend, you can create transitions by stepping the dot colours from lighter to darker tones and vice versa.
9. Dot placement
A good rule to follow is putting down larger dots to fill an area first and then using gradually smaller dots to fill in the space around the larger ones.
10. Finishing touches
Once your painting has dried, gently wipe it down with a damp cloth to remove the charcoal outline. You’re done!
If you’d like to check out our dotted painting video lesson you can watch it here. And don’t forget to share your artworks with us by tagging us on Instagram, Facebook or Twitter using @montmarteart.


