


Halloween is just around the corner, so if you’re looking for some fun Halloween DIY projects to create, we’ve rounded up our top crafty projects for you to try your hands at.
1. Ghost mobile
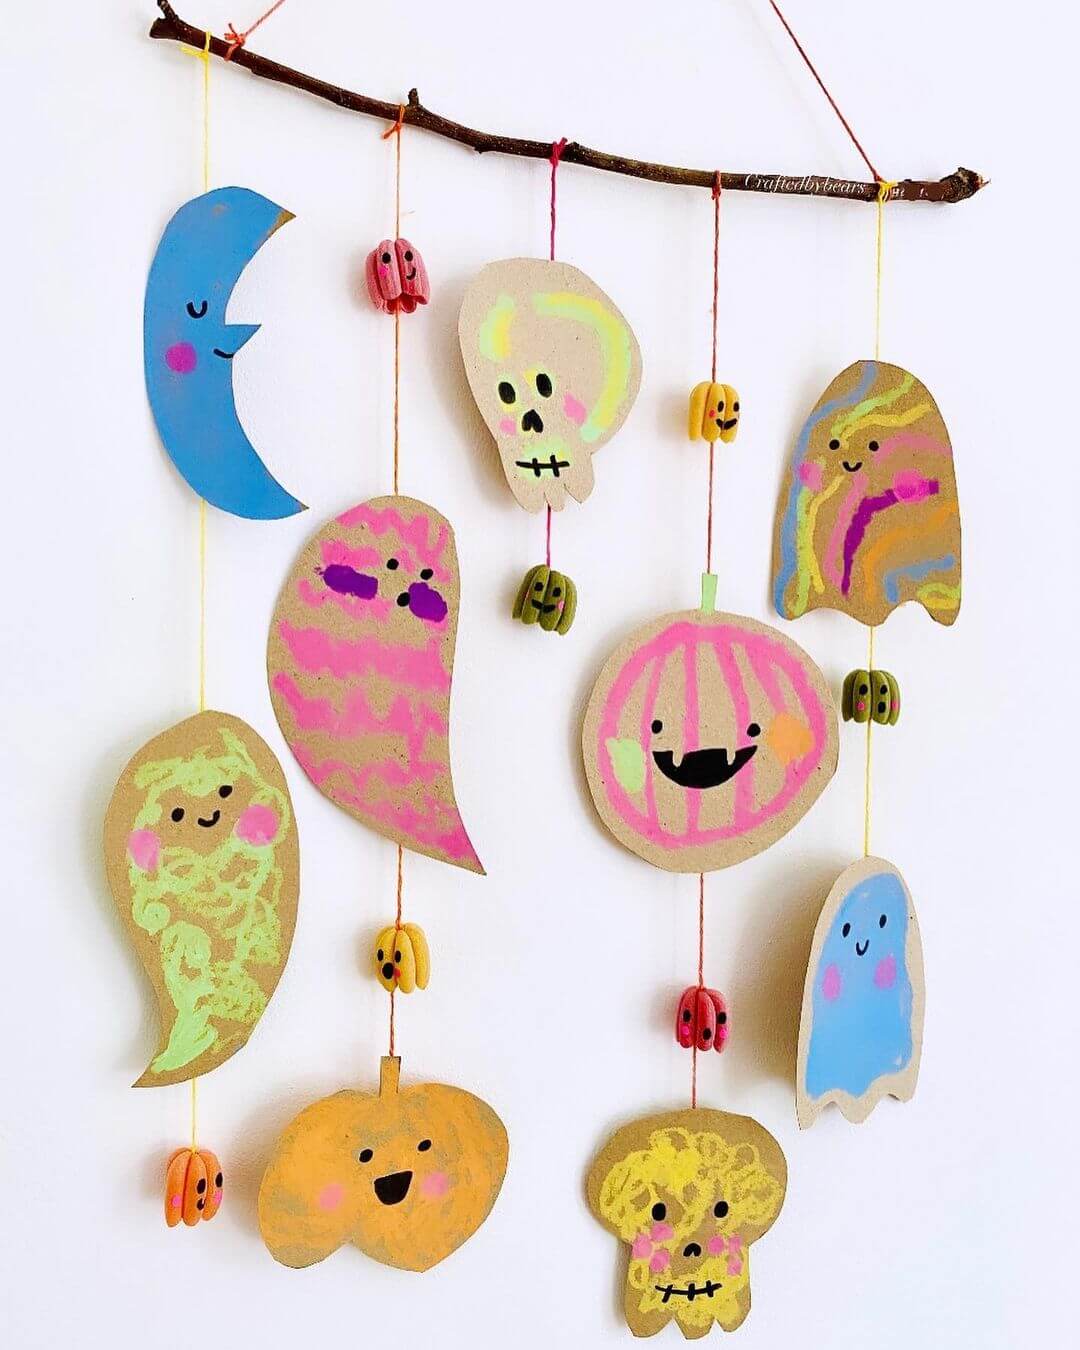
Image: craftedbybears
Whether you put a spooky spin on a mobile or create this as a fun wall hanging, either way, we reckon this Halloween DIY project is worth a try. This idea is also really versatile, you can play around with coloured card or use some left-over cardboard and get creative with the paints.What you’ll need:
• String
2. Handprint Spiders

Image: thesimplelifeofoliver
We all know how much fun Halloween craft is to make, but you can also use this time to create a nice Halloween keepsake with your little artist too!
What you’ll need:
• White/orange paper
• White and black poster paint
• A small detail brush
• Googly eyes
• A black marker
• Craft glue
Using a marker, draw a web in the corner of the page for your spider. You can draw three lines coming from the corner, then use scallop lines to build a web. If you’re using coloured paper, you can paint your web using white paint and a brush, or for white paper, use a black marker. Your little artist will then need to pop their hands in some black paint and press their hands onto the paper.
Use both left hand and right hands to create the spider’s legs. Let this paint dry and wash hands. Once dry, use white paint to add a smile to the spider’s face and glue on some googly eyes, all done!
3. Popsicle stick haunted houses

Image: imperfectmomof3babes
This fun and easy Halloween craft idea is great for the bigger kids or those looking to get a little crafty during October (guilty!)
What you’ll need:
House:
• Popsicle sticks
• Acrylic paint (you’ll need black and a colour to paint the house)
• Small paint brush
• Spider webbing or cotton wool buds
• Black pipe cleaners
• Ring pasta/ small circle for the door
• Foam sheet
• Craft glue
• Halloween stickers or decals
Flags:
• A wooden skewer or toothpick
• Paper
• Yarn/wool
Place the sticks in a line (around 8 sticks wide) with two sticks intersecting for the roof. Glue these to a piece of foam. Once dry, paint the sticks with the colour of your choice. Add a pipe cleaner for the door and a piece of ring pasta for the doorknob. Then add your Halloween stickers/decals. Add some spider webbing or cotton wool for the top of the house too -- working at an angle works best.
While the glue dries, you can create a flag for the front door! Paint a skewer with black paint and use half for the flagpole. You can add a small sign using paper and a marker or print one out and cut in a triangle shape. Then tie a piece of wool to the flag.
Complete your craft by gluing the houses onto paper and gluing the flag on an angle to the front of the house! You can take this idea further and add a spooky graveyard garden for your house or just create the haunted house, it’s up to you!
4. Paper plate moons

Image: lindsayjo27
If you’re running out of time for Halloween craft or looking for a fun, quick and easy project, this one’s for you! These paper plate moons would look great hanging up around the home during the spooky season too. What you’ll need:
• Paper plates
• Scissors
• Black poster paint
• Paint brush
• Craft glue
• Star glitter
Cut your paper plates into a crescent shape for the moon. Then grab black poster paint and paint both sides of the plate. Once that’s dry, you’re ready to decorate! Squeeze some craft glue out onto the moon, then sprinkle some glitter on top. Or if you’re wanting to get a little craftier, you can paint some stars with metallic paints, then leave to dry and you’re all done!
5. Pumpkin fun

Image: mademoiselle__rosie
Of course, where would we be without a painted pumpkin?! These look great around the house, and you can make them as detailed or as colourful as you want! What you’ll need:
• Pumpkins
• Your choice of coloured acrylic paint
• Brushes
If you’re a planner, you can use a light coloured marker to plan your design first. Or jump straight into it and get painting! If you’re using plastic pumpkins, a coat of gesso will keep your paint coat even and your paint will last a little longer. For real pumpkins, acrylic paint will do the trick.
Try pastel colours, spots, stripes, or polka dots, then add a coat of gold paint to your pumpkin stalk, for a lux feel as well, of course! Or you could also try a reusable air dry clay pumpkin!
6. Pumpkin mosaic

Image: bayitshelsafti
If painted pumpkins aren’t your style or you’re looking for another craft idea, then try this pumpkin mosaic project! What you’ll need:
• Paper
• Craft glue
• Orange paper or orange crepe paper
• Scissors
• A green and black marker
• Glitter
Start by drawing a pumpkin onto the white paper using a marker. If you’re not a keen drawer, you can skip this step and find an outline online, print this onto white paper. Then cover the outline of the pumpkin with craft glue. Sprinkle orange glitter on the paper, the glue will catch the glitter and you’ll have an orange, glittery outline. Leave this to dry and begin cutting squares of orange paper out. Once you’ve got plenty, add some craft glue to each piece and begin placing your mosaic. Leave this to dry and your Halloween mosaic masterpiece will be ready to hang!
Handy tip: if you’re looking for a tidier option, try using glitter glue instead of loose glitter!
7. Egg carton spider

Image: lovedbydannii
This recycled project is great not just for Halloween, but if you’re also looking for a fun, rainy day activity to create with the little ones. Turn a boring old egg carton into a spooky spider and once the sun’s out, your little artist can play around with them in the garden.What you’ll need:
• Egg carton
• Scissors
• Craft glue
• Googly eyes
• Pipe cleaners
• Poster paint and a brush
Cut an egg carton so you’ll have two sections, one for the head and the other for the spider’s body. Paint the egg carton with poster paint and leave to dry. Once dry, pop four small holes on each end of the carton, (two in first section and two in the back, repeat this on the other side). Then thread the pipe cleaner through for the spider’s legs. You should now have 8 legs for your spider! Add some googly eyes using craft glue on the head, then you’re all done!
8. Origami pumpkins

Image: wu.nder_days
If you’re looking for an origami project or just looking to flex your folding skills, then try this origami pumpkin project. What you’ll need:
• Orange 12 x 12 paper or any square size
• Green crepe paper
• Scissors
• Light green cardstock
• A glue stick
• Glue gun or craft glue
This project can be a little tricky to get the hang of, especially if origami isn’t something you’re used to, but we reckon it’s worth giving it a go! You can find the instructions here. Play around with different paper patterns and create a whole bunch for your Halloween décor.
9. Ghost garland

Image: Redrockingbird
This ghost garland is such a fun Halloween DIY project! You can create this for a mantlepiece, for a wall or decorate an entire room! It’s fun and easy to create and best of all, you don’t need a lot to get started! What you’ll need:
• White paper
• A graphite pencil
• Black marker
• Scissors
• String
• Sticky tape
Measure out how long you’d like your ghost garland to be with string. Using white paper and a graphite pencil, begin drawing your ghosts on, then cut them out with scissors. You can make these different sizes or keep your ghosts looking the same and stick to the one shape. Once you’ve got your ghosts, you can add their faces! Play around with different expressions then tape each ghost to the string! All done!
10. Ghost Leaves

Put those spare autumn leaves to good use with this easy, ghost leaf Halloween craft idea. Clean up the yard and have a bit of fun with some of the left-over leaves. Once you’re finished, you can turn your ghosts into a garland with a bit of string or simply sprinkle them around the home for some seriously spooky décor.
What you'll need:
-
Old leaves
-
White acrylic paint or poster paint
-
Paint brush
-
Scissors
-
Permanent marker
Start by collecting some old leaves, then paint each leaf - front and back, using a white acrylic or poster paint and leave to dry. You can grab a pair of scissors to make the leaves a little rounder or leave be, the choice is yours! Then grab a permanent marker and draw ghoulish faces to complete your new ghosts.
11. Jack o'lantern apple stamps

These fun jack o'lanterns certainly get our stamp of approval. Try your hand at creating these jack o'lantern stamps like this little artist! You can create this project using an apple and some spare bits and bobs from around the house.
What you'll need:
-
An apple, cut in half
-
Acrylic paint or poster paint (orange, black and green)
-
Small paint brush
-
Googly eyes
Simply cut your apple in half, then dip the inside of the apple into the orange paint. Press the apple onto the paper firmly and then lift to reveal your new pumpkin stamp! Then using a small brush, add a mouth to your pumpkin, pop on the stalk and glue the googly eyes on to your jack o’lanterns.
12. Mummy jar lanterns

Swap out the jack o'lanterns for this mummy lantern, using a mason jar. This is an easy Halloween DIY project that the kids will love. Use them out the front to light the porch for Halloween trick or treaters!
What you'll need:
-
Mason jars
-
Black acrylic or poster paint
-
Small round brush
-
Plaster cloth wrap or hessian
-
Scissors
-
Bowl of water
-
Tealight or LED lights
We’ve created a tutorial for you to follow here. Because mason jars are glass, you can use candles, provided the cloth wrap is glued to the outside of the jar and not inside. But if you have little kiddies, then LED lights will be the go. These LED lights look like real candles and flicker in the same way a candle does.
13. Air dry clay ghost lanterns

Create your very own spooky ghost lantern using air dry clay. This is a super easy Halloween craft idea, all you need is some air-dry clay, aluminium foil, a long-handled paint brush and an LED tea light.
What you'll need:
-
Air dry clay
-
Aluminium foil
-
Long-handled paint brush
-
LED tea light
We’ve created a video showing you how to create this fun ghoulish project here. We suggest grabbing an LED tea light candle to create a candle-lit effect!
14. Frightful Ghost Cards

This Halloween DIY project doesn’t just make for great cards, you can turn it into a great wall hanging, table decoration or just an idea for when you’re looking to have some fun.
What you'll need:
-
Thick paper
-
Two colours of acrylic or poster paint (we used light purple and purple).
-
A pencil
-
Cotton buds
Follow along with our tutorial here. You don’t have to use the same coloured paint that we have, use any colour combination and create your way!
15. Trick or Treat Bag

Looking to create something fun to carry your Halloween treats in? Well we’ve got it in the bag, with this fun tote project. You won’t need a fancy screen printer for this, just grab some fabric paint and a spare tote bag to get cracking.
What you'll need:
-
A blank tote bag
-
Orange fabric paint stick
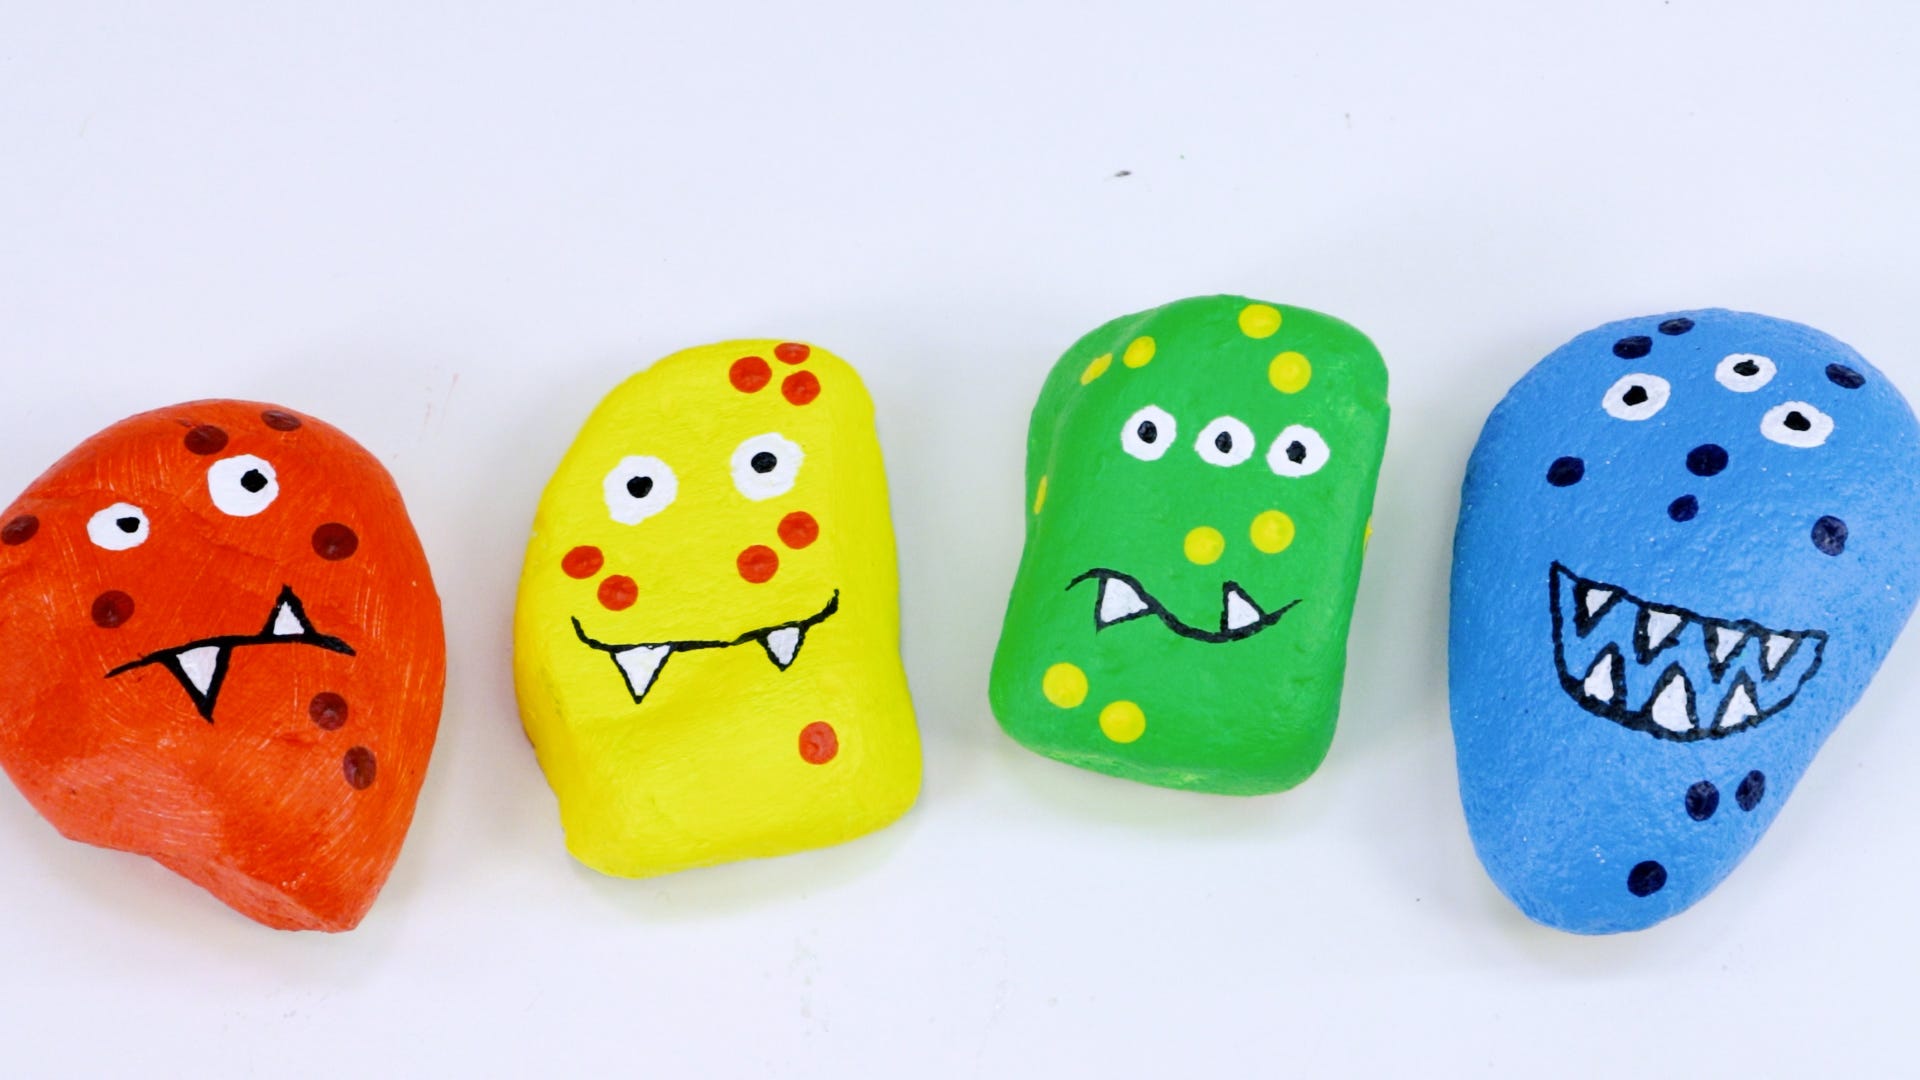
16. Rock Monsters

Create a fun Halloween DIY project that truly rocks with these monster rock ideas. You can use smaller rocks for a more detailed project or choose larger rocks if you don’t have a lot of time on your hands. If you’ve sourced the rocks yourself, you can wash the rocks and let them dry a day or so before getting started.
What you'll need:
-
Rocks
-
Acrylic or poster paints
-
Tear off paper palette
-
Fine brush
-
Medium brush
-
Wide brush
Follow along with our tutorial here to create your very own rock monsters. Once finished, you can pop these monsters around the house or use them as napkin weights at your Halloween party.
17. Toilet roll Monsters

Kids will be wrapped up in making these Halloween characters! Simply, grab an empty toilet roll and let your imagination unravel.
What you'll need:
-
Acrylic or poster paint
-
Tear off paper palette
-
Black and white paper
-
Fine brush
-
Medium brush
-
Large brush
-
Pencil
-
Bandages
-
Tape
-
Toilet rolls
Check out our lesson here. In this project we created Frankenstein, a mummy and Dracula. But you could also try ghosts, bats, witches and aliens, create something truly yours.
18. Pumpkin painting

Why not try your hand at painting a pumpkin with this Halloween craft idea. Painting your own pumpkin, is both a ton of fun and an easy way to brighten up your home.
What you'll need:
-
A pumpkin
-
Acrylic or poster paint (light pink and white for this idea)
-
Large paint brush
-
Medium sized, round paint brush
-
A permanent marker
-
Coloured ribbon or string
Begin by painting your pumpkin with your base colour, using a large brush to cover the whole surface, all the way around. Let this coat dry before starting the next. Once dry, you can add your decorative touches! Like this idea, you can paint small ghosts all the way around, or experiment with polka dots, glazes, glitter, gold flakes, it’s up to you!
If you’ve chosen ghosts, you can go in with white paint on a medium sized, round paint brush, to draw your ghostly shapes. Then add the eyes and mouth with a permanent marker! Seal the deal by securing a coloured ribbon or string around the top of the pumpkin, tie it in a bow and you’re done!
19. Handprint Witch

Get your hands messy and give this fun, hand painted witch a crack! All you need is some paint, a canvas and a few paintbrushes.
What you'll need:
-
A canvas
-
Acrylic or poster paint (Green, orange, white, purple yellow, black and brown).
-
Large paint brush
-
Small detailer brush
Begin by painting the canvas a lighter colour like purple for a night sky. Once dry, spin the canvas upside down, then grab a hand and dab your hand into the green paint. Stamp your hand down onto the canvas to create your witch’s body. Spin the canvas back upright and grabbing a thinner brush, begin adding in your broom stick.
Once the green has dried, grab an orange paint to paint the hair then add your witch’s hat and buckle. To finish the piece, add a moon and a few stars to brighten the night sky. Then you’re ready to hang your new spooky piece!
20. Origami Bat

Try your hand at origami and create this fun little origami bat! These bats are not only great for wall decorations, but also make for handy little bookmarks.
What you'll need:
-
Black paper in a square (around 20cm x 20cm)
-
Scissors
-
Pen
-
Glue
-
Paper for decoration (White and pink)
Follow along with this instruction guide and soon enough you’ll have your very own little origami bats!
We hope that you feel inspired to create a Halloween DIY project. Try these ideas for yourself and #montmarteart or tag us @montmarteart on Instagram or Facebook, we’d love to see what you create.
Looking for more? Check out our Halloween projects here or our Guide to Halloween face paint.


