


From Easter baskets and vases to polymer clay Easter egg earrings, we’ve got plenty of projects and ideas to keep you busy during the Easter break. So, get cracking with these 25 easy Easter craft ideas.
1. Paint Easter eggs
If you’re looking for some easy Easter activities for the holiday break or just looking for some chocolate-free time for the kids, why not paint some eggs? These look great as centre pieces for the table, or just for a fun afternoon activity.
What you’ll need:
- Eggs
- Acrylic paint
- Brushes
Unleash your inner artist and have some fun playing around with different colours and designs. Looking for inspo? We’ve got a handy tutorial showing you how to paint Easter eggs here.
2. Bunny pencil holders
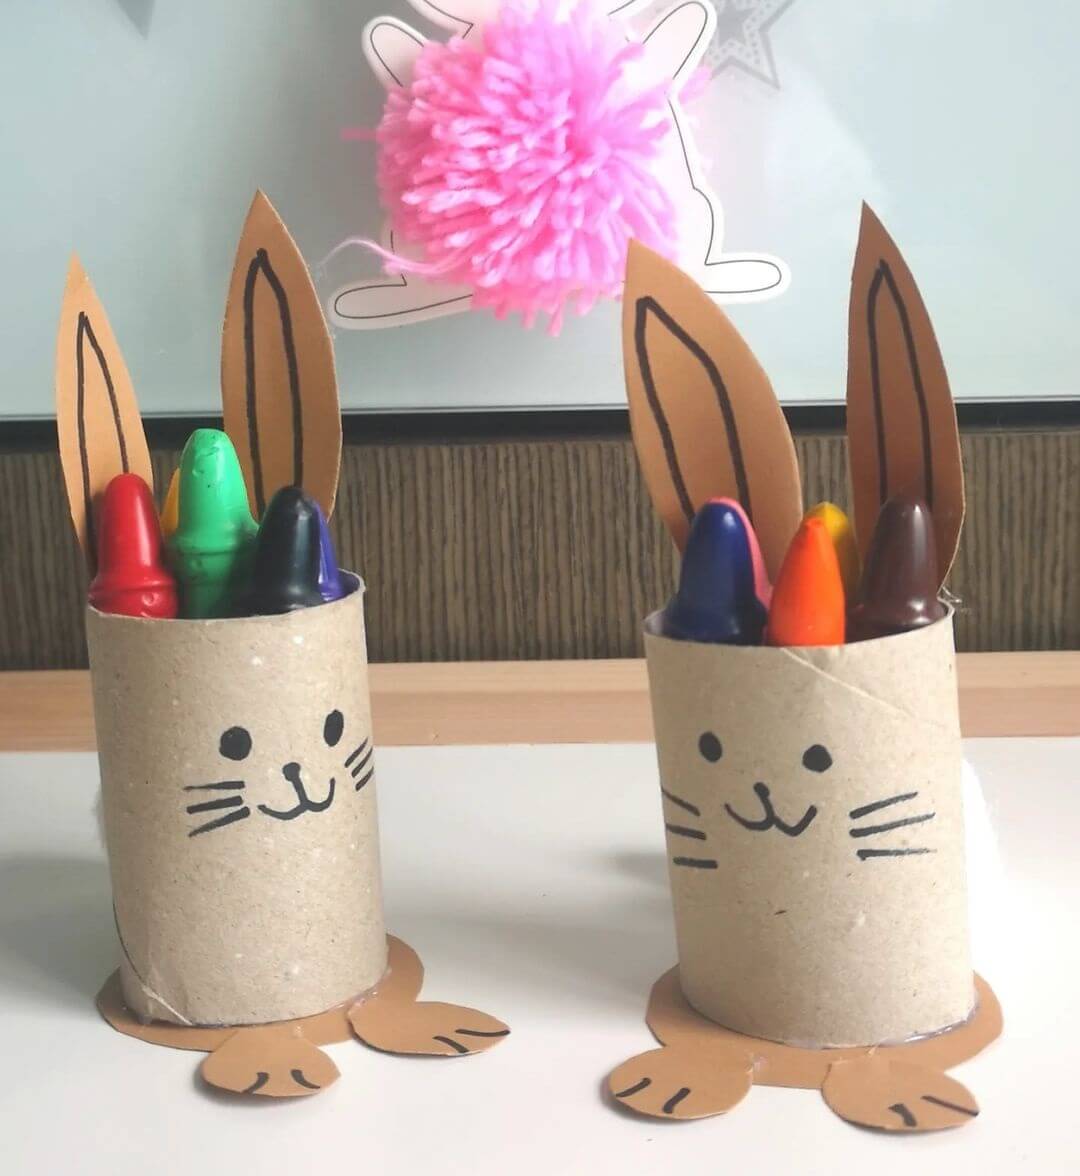
Image: sweethaizea
Looking for a quick Easter craft idea that you can use long after you’ve created it? Try making these cute Easter bunny pencil holders and use them to store your pencils, crayons or markers afterwards!
What you’ll need:
- Toilet paper roll
- Cardboard
- Black marker
- A cotton ball
- Craft glue
- Scissors
Grab a piece of cardboard and measure out a circle for the base, (you’ll want this to be a bit bigger than the base of the toilet roll), then create two small circles for the feet. Next, cut out two oval shapes for the ears, you can add some detailing here too like the inside of the ears and feet. Then attach these to the toilet roll with craft glue. Grab a cotton ball for the bunny’s tail and glue this on the back. Once dry, you can add a face to the bunny or even paint it if you like! Then, you’re ready to enjoy your new pencil holder!
3. Paper plate bunnies
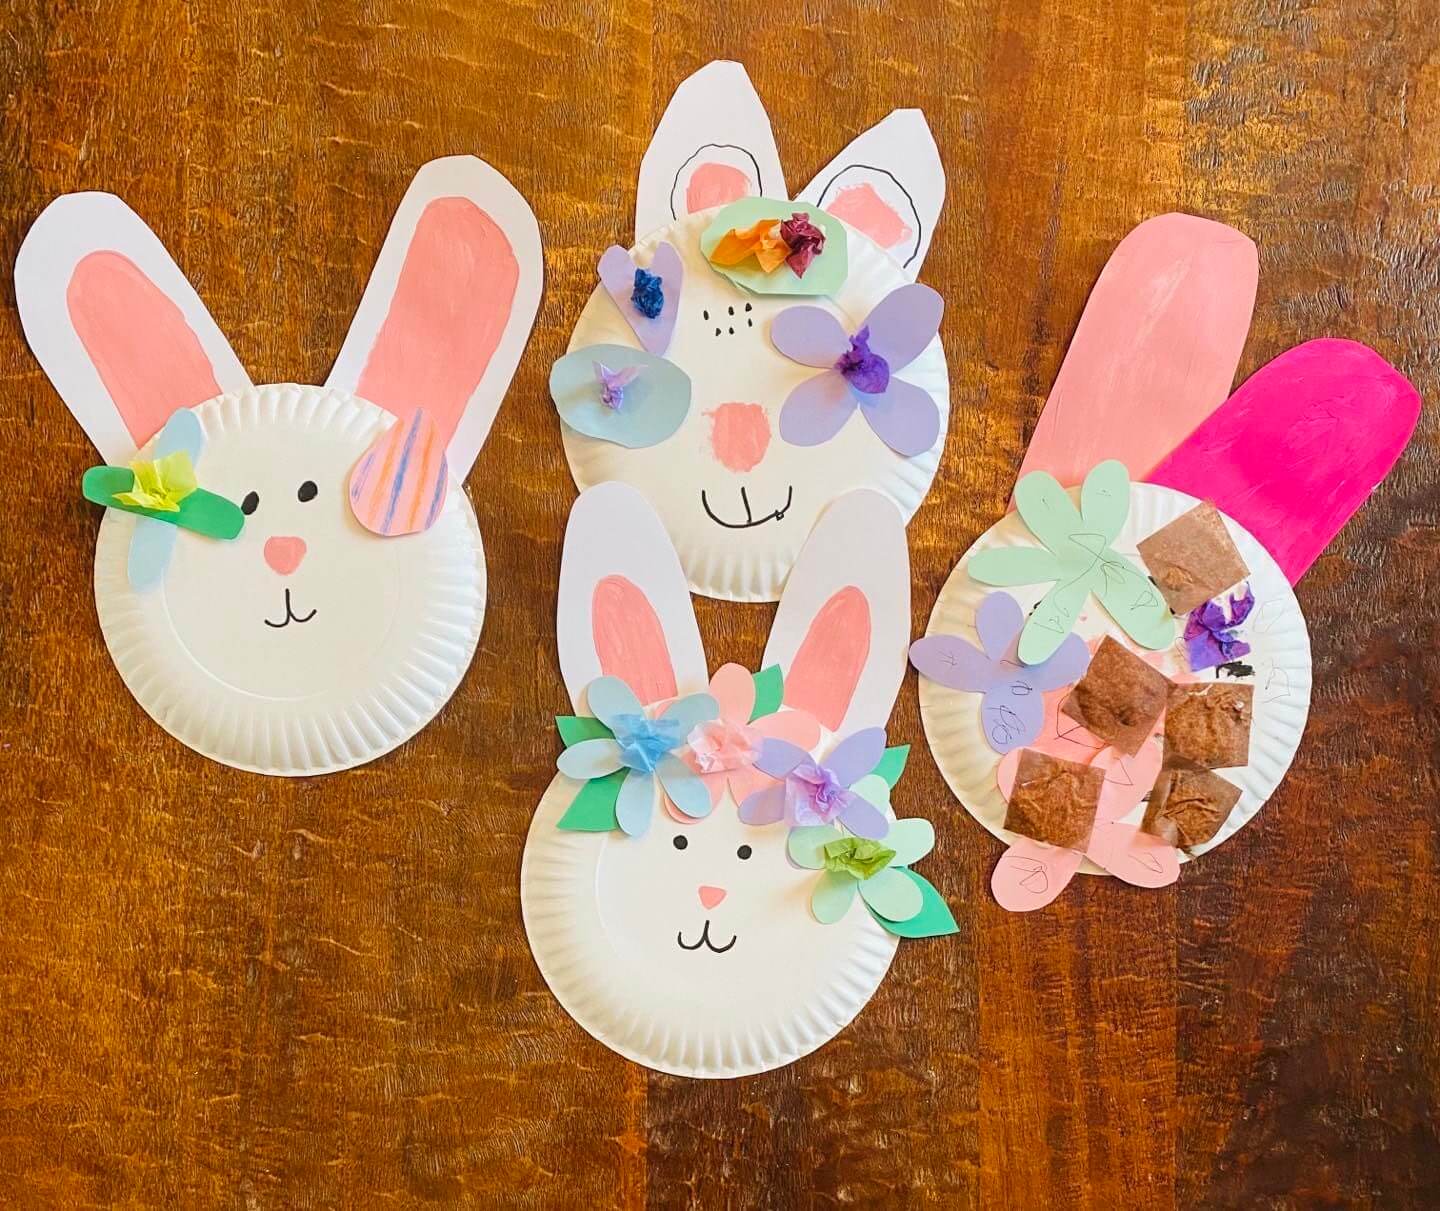
Image: homeschool.learning
Recycle those left-over paper plates from Easter lunch and raid the craft box with this easy Easter activity. This is a great way to recycle any of those extra, craft, bits and pieces and have fun creating an Easter craft too.
What you’ll need:
- White paper plate
- Cardboard (white, pink and any extra colours)
- Black marker
- Craft glue
- Scissors
Start by turning the paper plate around, so you’re working on the outside (not where you’d eat off), then cut out some shapes from cardboard for the bunny’s ears. You can use white and pink or colour the cardboard in with a pink marker. Then cut out a small piece of pink cardboard for the nose. Glue these pieces onto your paper plate, then add a bunny face with a black marker. You can add some little flowers from the coloured cardboard too and stick them to the side for interest. Just have fun with it and let your imagination (or the crafty leftovers) decide!
4. Draw fun faces on eggs
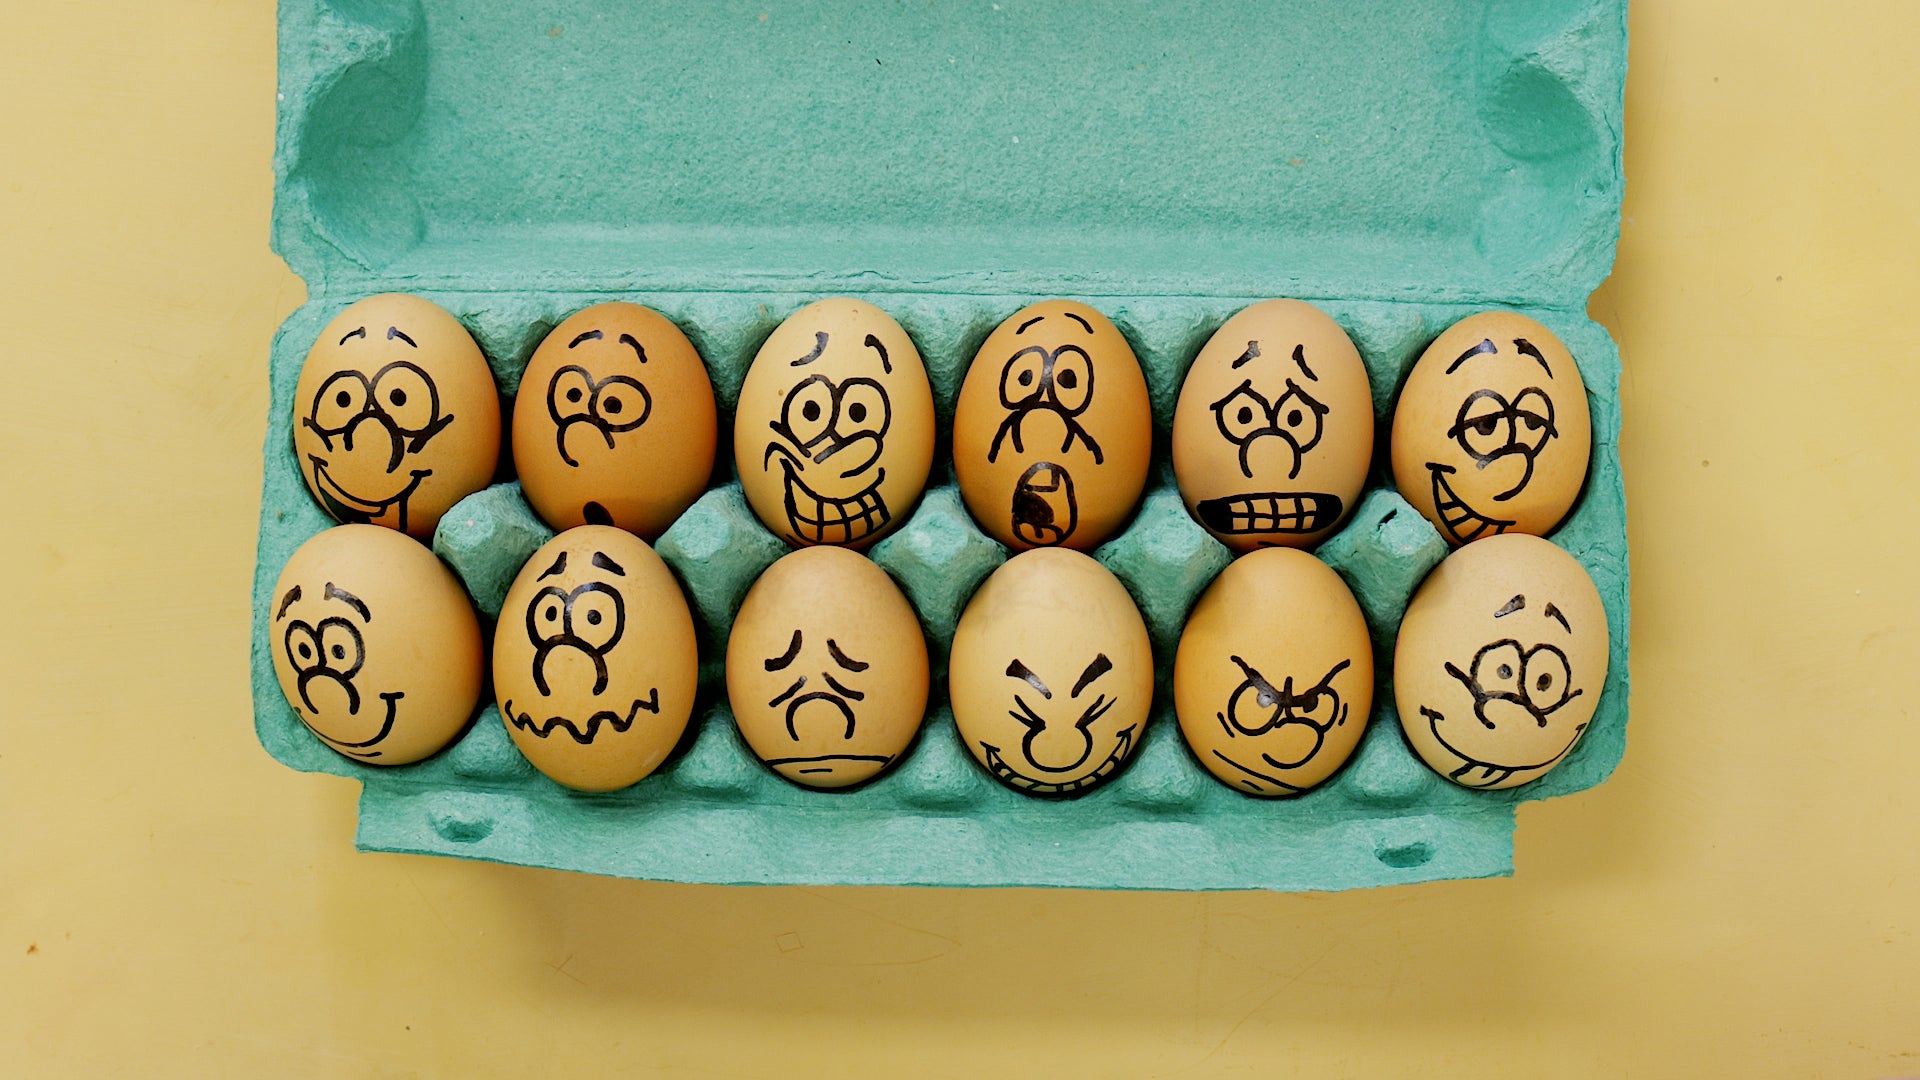
Kids will love this one! Drawing funny faces on eggs isn’t just a fun one for the kids, it can also be a great way for little ones to learn about emotions and feelings. Recognising emotions like happy, sad, frightened and surprised, can help little artists to identify and explain their emotions too.
What you’ll need:
- Hard boiled eggs
- Acrylic Paint Pens
Have fun playing around with different faces and see what you come up with.
Best of all, we’ve got everything you need to know, so you can follow along with the steps on how to draw on Easter eggs in our video.
5. Add nature to Easter eggs
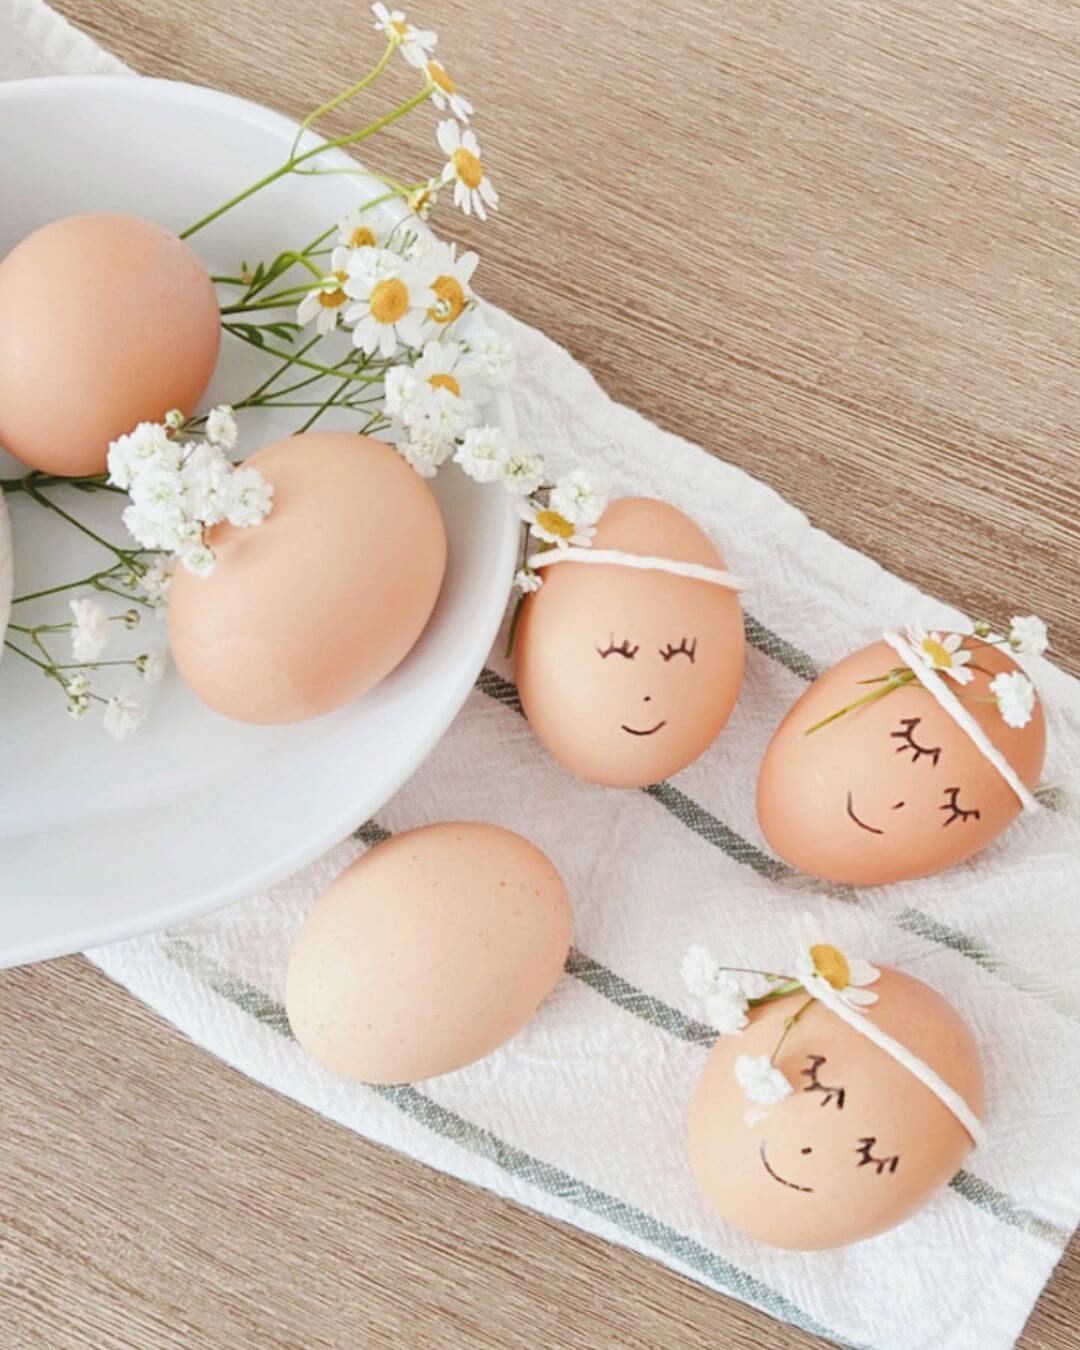
Image: the_harris_house_usa
If you’re looking to add some nature in or trying to find a simple way to add those beautiful spring flowers to your craft, try this activity!
What you’ll need:
- Eggs
- Black marker
- Kitchen string
- Craft glue
- Small flowers
- Scissors
Prepare your eggs first, you can find more in our how to draw on Easter eggs video. Then using a black marker, draw your faces on the eggs. Grab some kitchen string and measure out enough length to go around the egg, then attach it using some craft glue. Lightly poke the stem of the flowers through the string to finish! How cute!
6.Easter egg mosaic
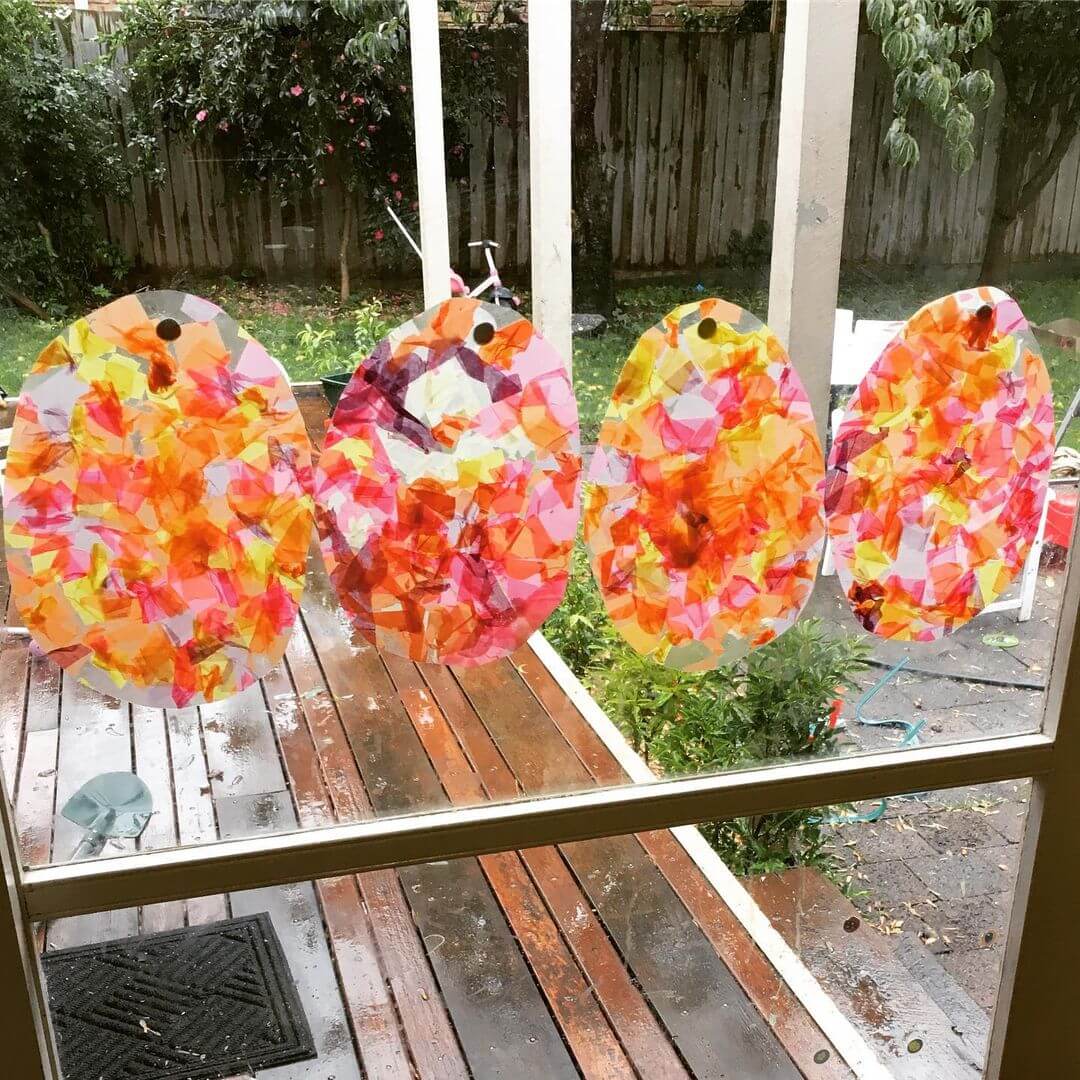
Image: thekidshappinesshunter
Looking for a mess-free Easter craft idea that the little ones will still have fun with? Easter egg mosaics it is! This is a great activity to also teach little ones about light (opaque, transparent and translucent) and you’ll have a pretty window decal too!
What you’ll need:
- Sticky tape
- Contact
- Crepe paper/cellophane
- Scissors
-White paper
-Marker/pencil
Using just regular copy paper, trace an egg shape out (looking to save on time? You can print one out instead), then cut out the shape. Sticky tape the contact sheet down (sticky side up) with the eggs underneath. Then tear or cut up pieces of crepe paper/cellophane to create your mosaic. Then place another piece of contact over the top and cut out the egg shape. Finish by displaying your new masterpiece on a window!
7. Fingerprint fun

Image: ella_rebekah_art
Have fun creating with your little artist and remember Easter with this cute keepsake! Best of all, you won’t need a lot to get creating either!
What you’ll need:
- Paper
- Yellow poster paint
- Orange and black markers
To start, dip a hand into yellow paint and press down onto the page to create yellow fingerprints, spreading them around the paper. Leave these to dry before picking up the markers and adding beaks, eyes and legs. You can also add little wing or feather details to the chicks too.
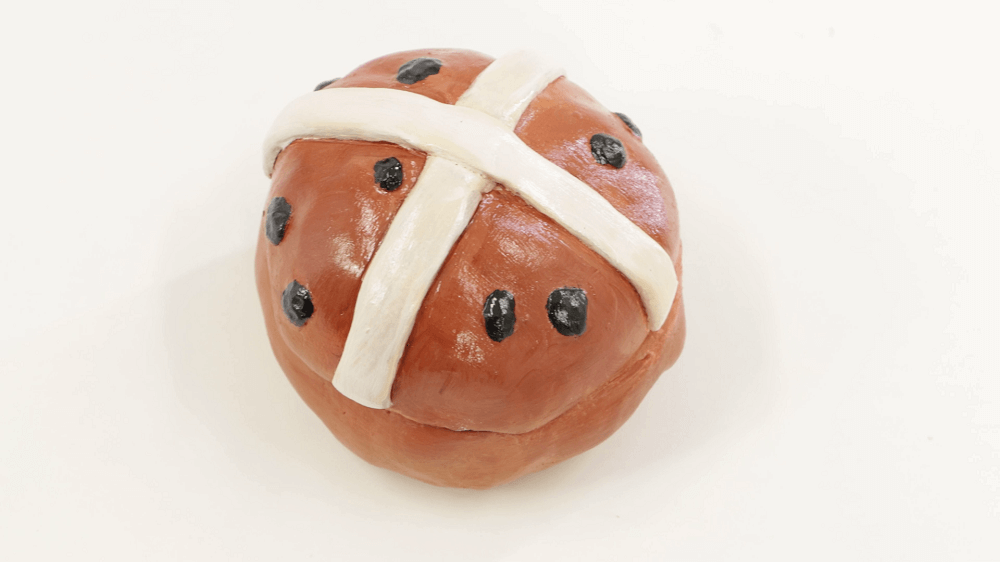
8. Hot cross bun trinket tray
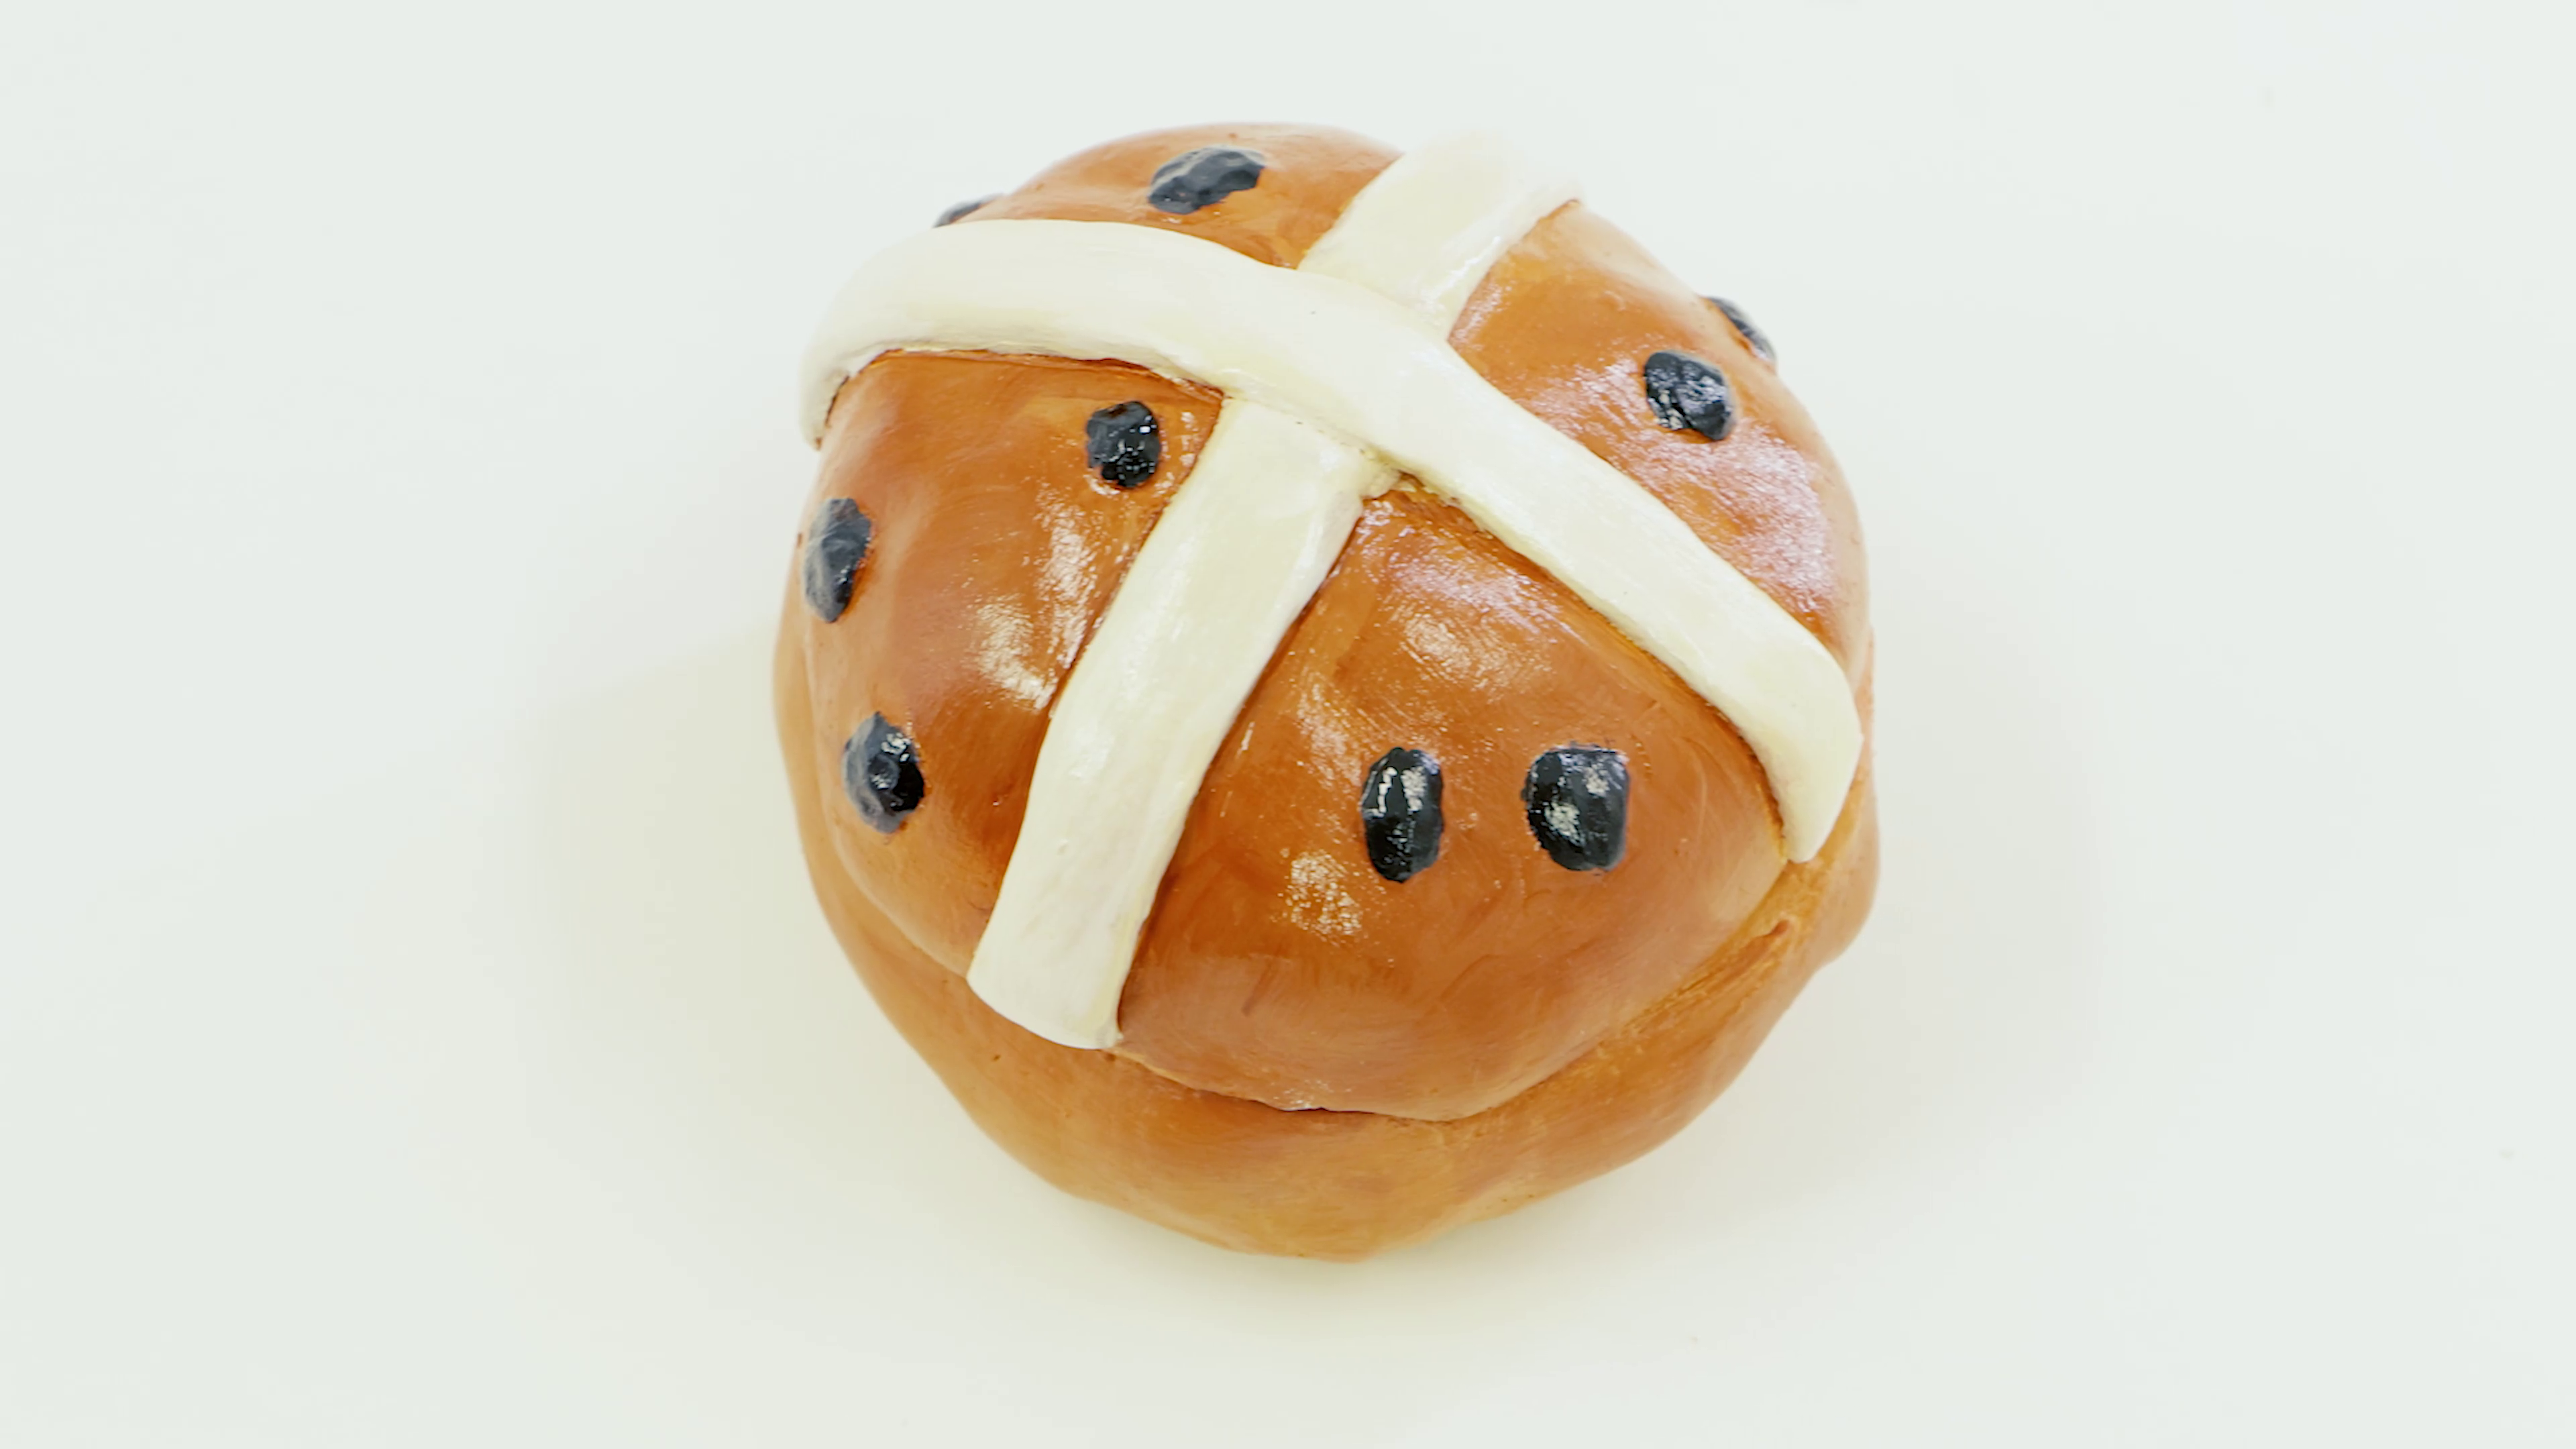
If you’re looking for a new, easy Easter craft idea, this one’s fresh out of the oven. This hot cross bun trinket tray is made with air dry clay and it’s pretty easy to create by yourself or alongside a little artist. Plus, it isn’t just a fun project to create during the Easter break, it’ll also store your precious bits and bobs well throughout the year.
What you’ll need:
-
- Air dry clay (we used terracotta)
-
- Acrylic paint (Burnt Sienna, Titanium White and Lamp Black)
-
- A flat taklon paint brush
-
- Palette knife
-
- A plastic palette as a work surface
To create the hot cross bun trinket tray, you can follow along with our step by step project here. We used air dry clay for this project, but if you’re wanting to use something more durable, or you have some extra clay laying around, you can also try using polymer clay.
9. Gold leaf eggs
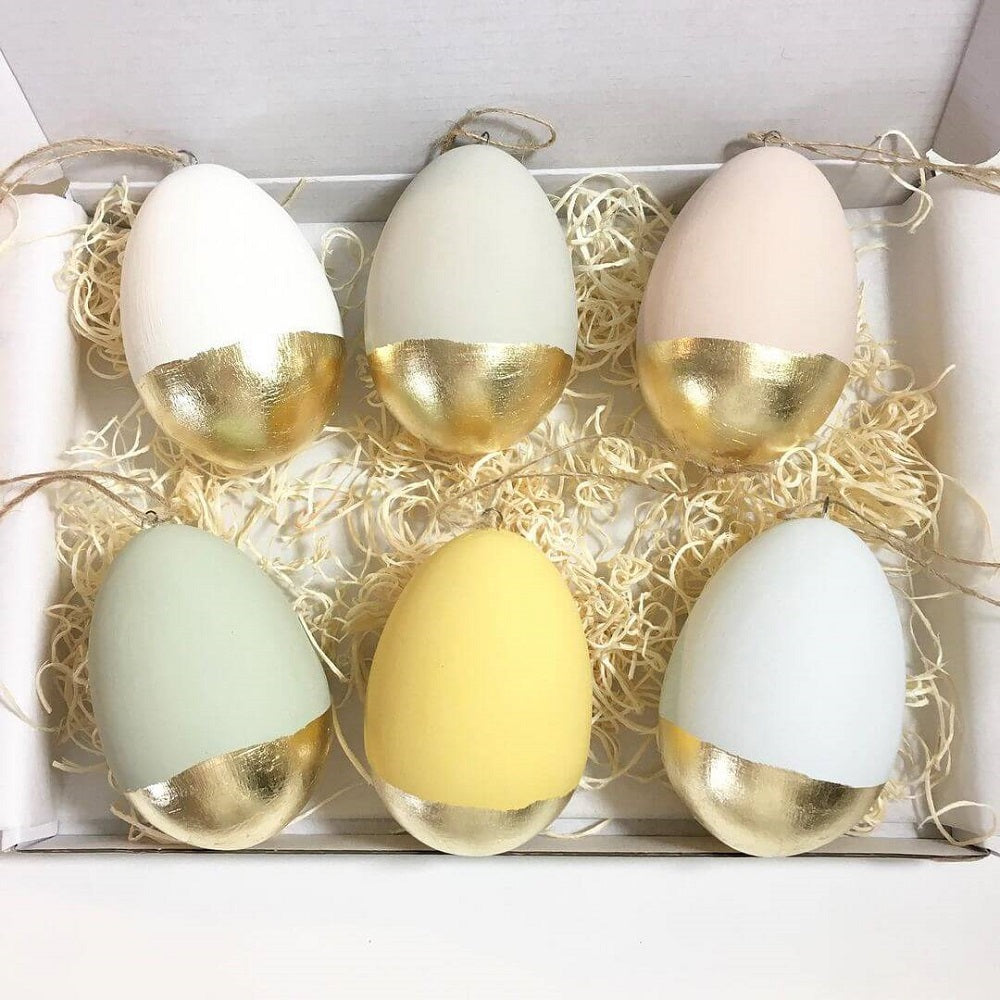
For an eggs-travagant take on Easter décor, brighten up your home and strike gold with this gold leaf DIY Easter project. This idea would be great for decorating tables at Easter lunch or for adding a nice, spring (or Autumn) touch to your home during Easter.
What you’ll need:
-
- Plastic eggs or hard-boiled eggs
-
- Acrylic paint
-
- Paint brushes
-
- Gold leaf
-
- Leaf sizing
To create these, begin by painting your eggs with your favourite colours. Pastel colours look wonderful against gold leafing, or let your imagination run wild and create your own designs. Then using a soft taklon brush, apply some leaf sizing adhesive to your egg. Lay the gold leaf onto the leaf sizing area and work your way around the bottom of the egg. If your gold leaf begins to fray, that’s fine! One of the best things about gold leaf is that it doesn’t have to be perfect! Let your eggs dry for 30 minutes, then they’re ready to show off.
10. Spring chickens

If you’re looking for something nice for the little ones to create over the Easter break, try this easy Easter craft idea. This spring chicken craft project will keep them entrained and it’s also a really nice way to see how big your little artists’ feet and hands have grown over the years.
What you’ll need:
-
- White, orange and yellow paper
-
- Poster paint (orange and yellow)
-
- Black marker
-
- Craft glue
-
- Scissors
Dip your little creator’s hands and feet into the paint, this idea used yellow for hands and orange for feet - it’s up to you, how you create! Then press the hands and feet onto some white paper. While these are drying, cut out a large circle shape using some yellow paper for the chicken, then a triangle shape for the beak using orange paper. Add some circles for the eyes and use a black marker to add pupils, then a little squiggle shape for the chicken’s comb on top. Glue these shapes onto the body and add any finishing touches.
Once the paint has dried, glue on the hands and feet for your chicken to finish!
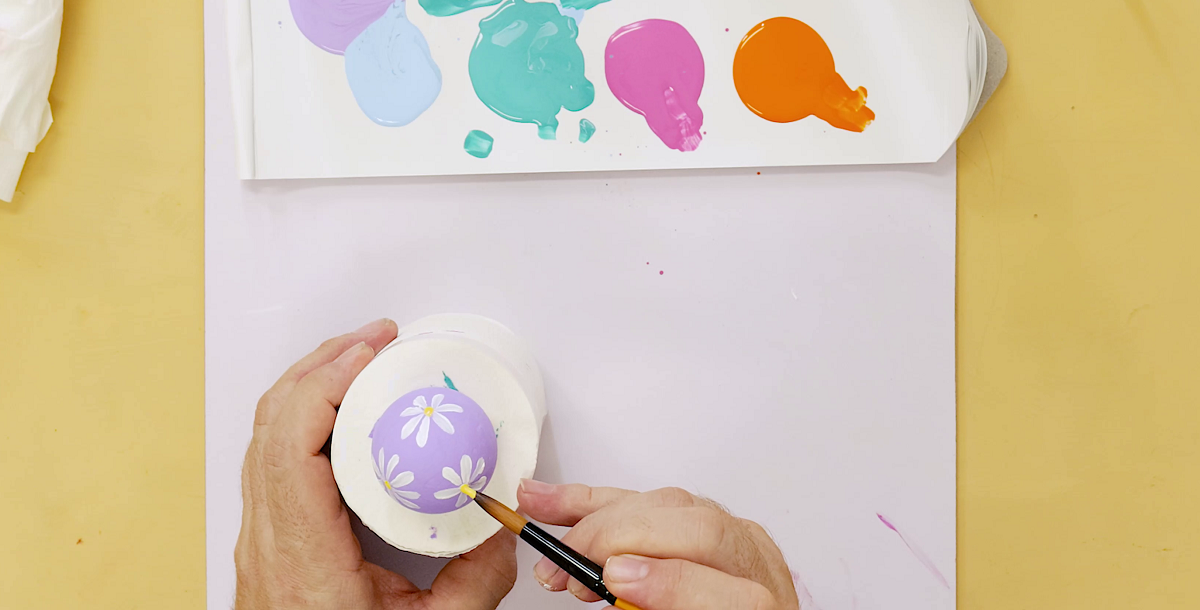
11. Easter earrings

Create something you can wear over Easter, or even as a little thank you to mum, grandma or the in-laws for hosting Easter lunch, with this polymer clay DIY Easter project. Have some fun over the Easter break, make a fashion statement or clay the day away with this idea.
What you’ll need:
-
- Polymer clay
-
- Earring hoops
-
- Palette Knife
-
- Rolling pin or a spoon if you're using smaller chunks of clay
-
- Pencil or paintbrush (to make a hole)
These pastel Easter earrings are super simple to make, follow along with our video project here for all the steps. We used pastel spring colours for our earrings but feel free to mix and match to create your own.
12. Easter cards
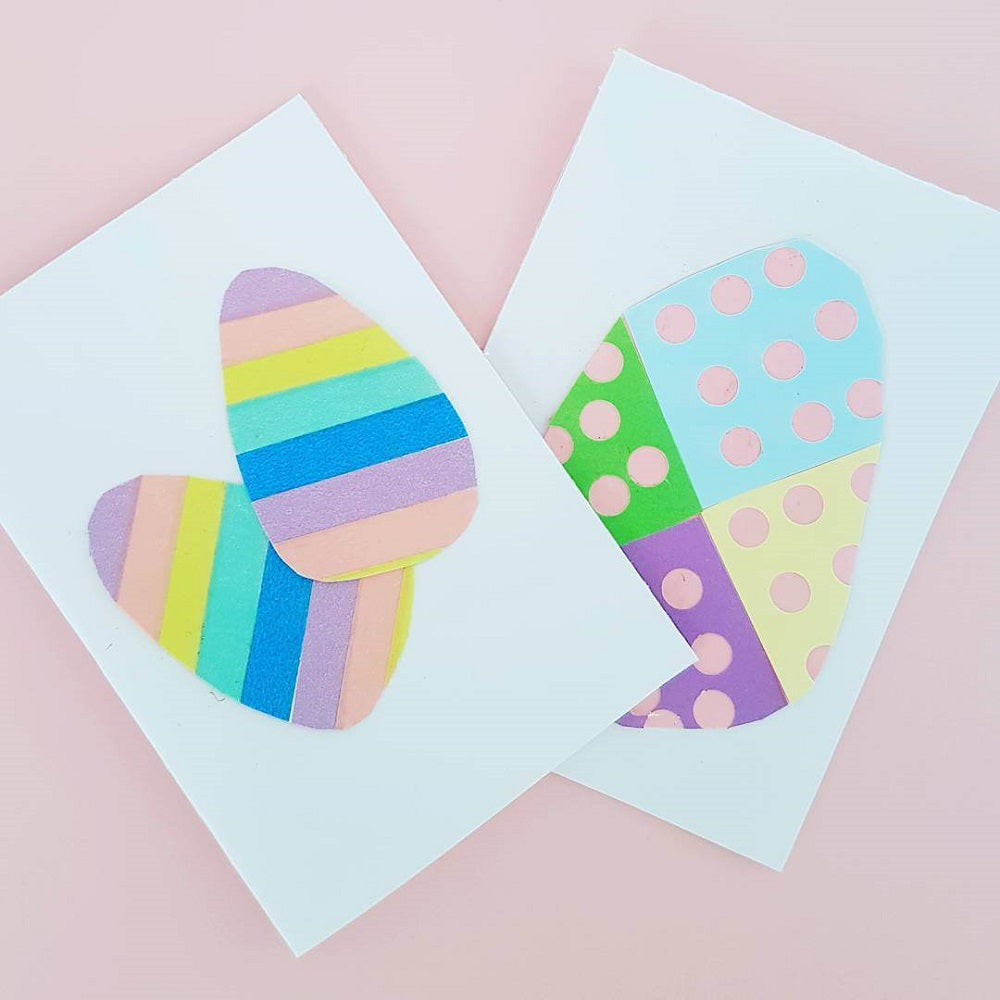
How cute are these Easter cards!? You don’t need a whole bunch of materials to make this easy Easter craft idea, just some coloured paper, a hole punch, cardboard for the card and some glue. Experiment using different shapes and colours to create unique designs on the Easter eggs.
What you’ll need:
-
- Coloured paper
-
- White cardboard
-
- Craft glue
-
- Hole punch
-
- Scissors
How you choose to create your design is up to you. Cut out pieces of coloured paper for stripes, use coloured tape or a hole punch to make spots on the paper like this idea. Have fun with it and let creativity out of the bag with this idea. Then glue your designs onto white cardboard and fold it in half, then your Easter card is ready for writing!
13. Easter Christmas Tree
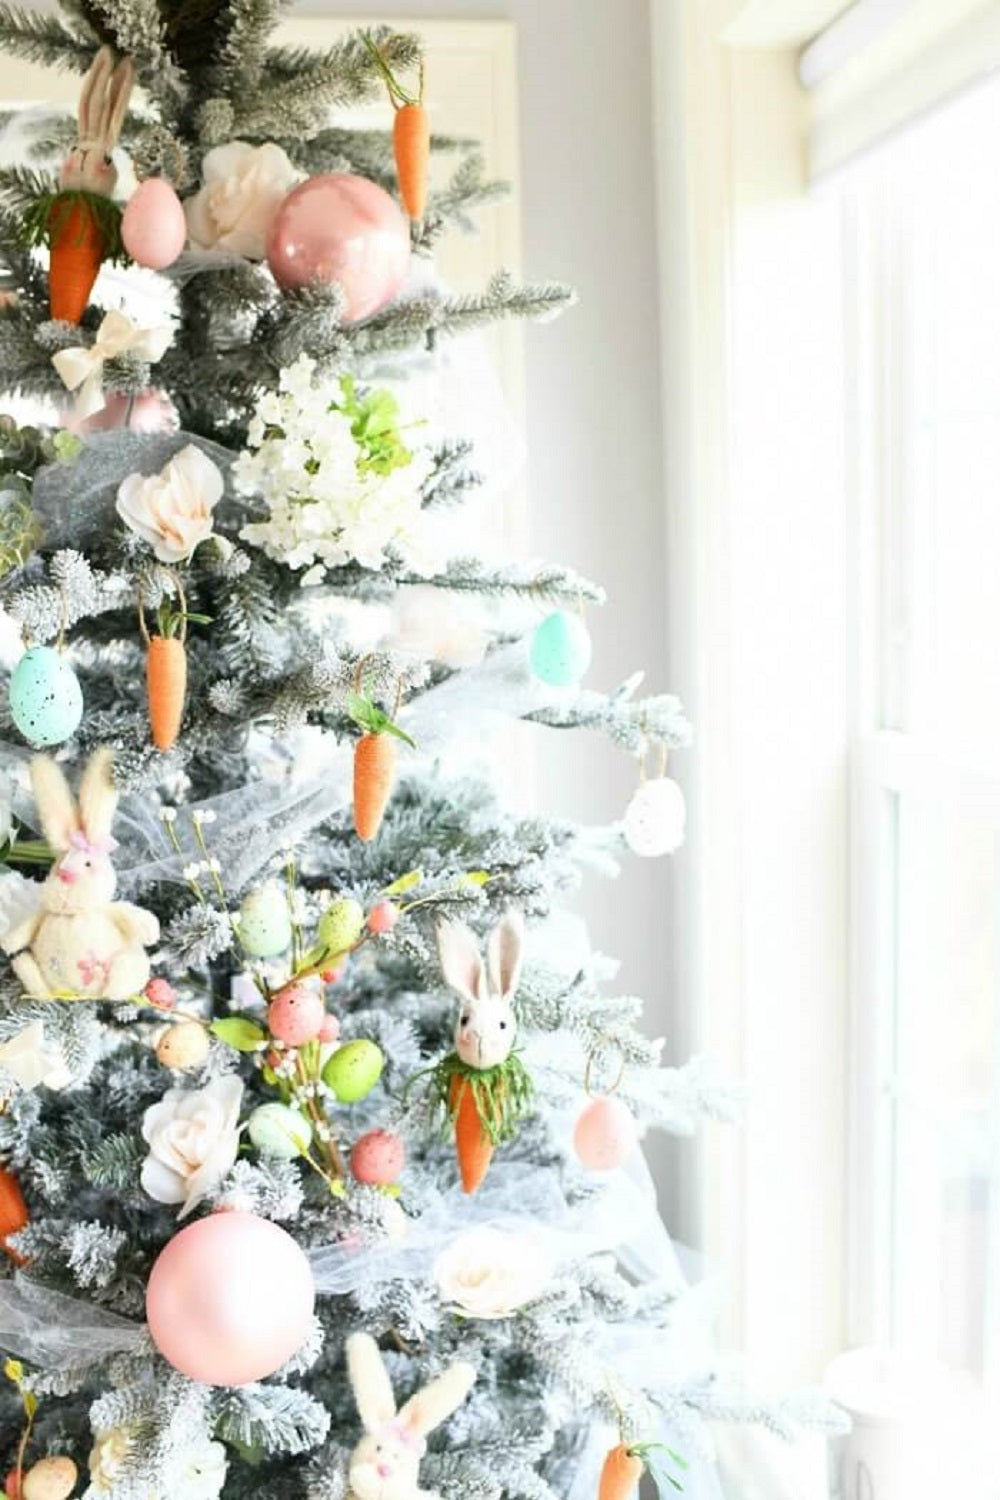
If you’re looking to spruce up your home with some Easter décor and decorating, why not dust off your Christmas tree and turn it into an Easter tree? This new trend, incorporates the magic of Christmas with the pastel pops of spring and it’s a fun DIY Easter project to create with the family.
What you need:
-
- Baubles
-
- Your choice of acrylic paint
-
- Paint brushes
-
- Gesso
-
- A Christmas tree
-
- Tulle garland
-
- Faux flowers
Using your old Christmas baubles, you can remove the colour by using methylated spirits on a paper towel. Then gesso the ball with a large brush to cover the surface. Then wait around 30 minutes for them to dry before you paint your baubles. Paint the baubles spring colours or pastel colours, you could even paint Easter egg designs or turn them into speckled eggs! Once you’re happy with your designs, leave them to dry, then add a tulle garland to the tree, some faux flowers and your choice of Easter trimmings, before hanging your new Easter baubles!
14. Pour painted Easter Eggs
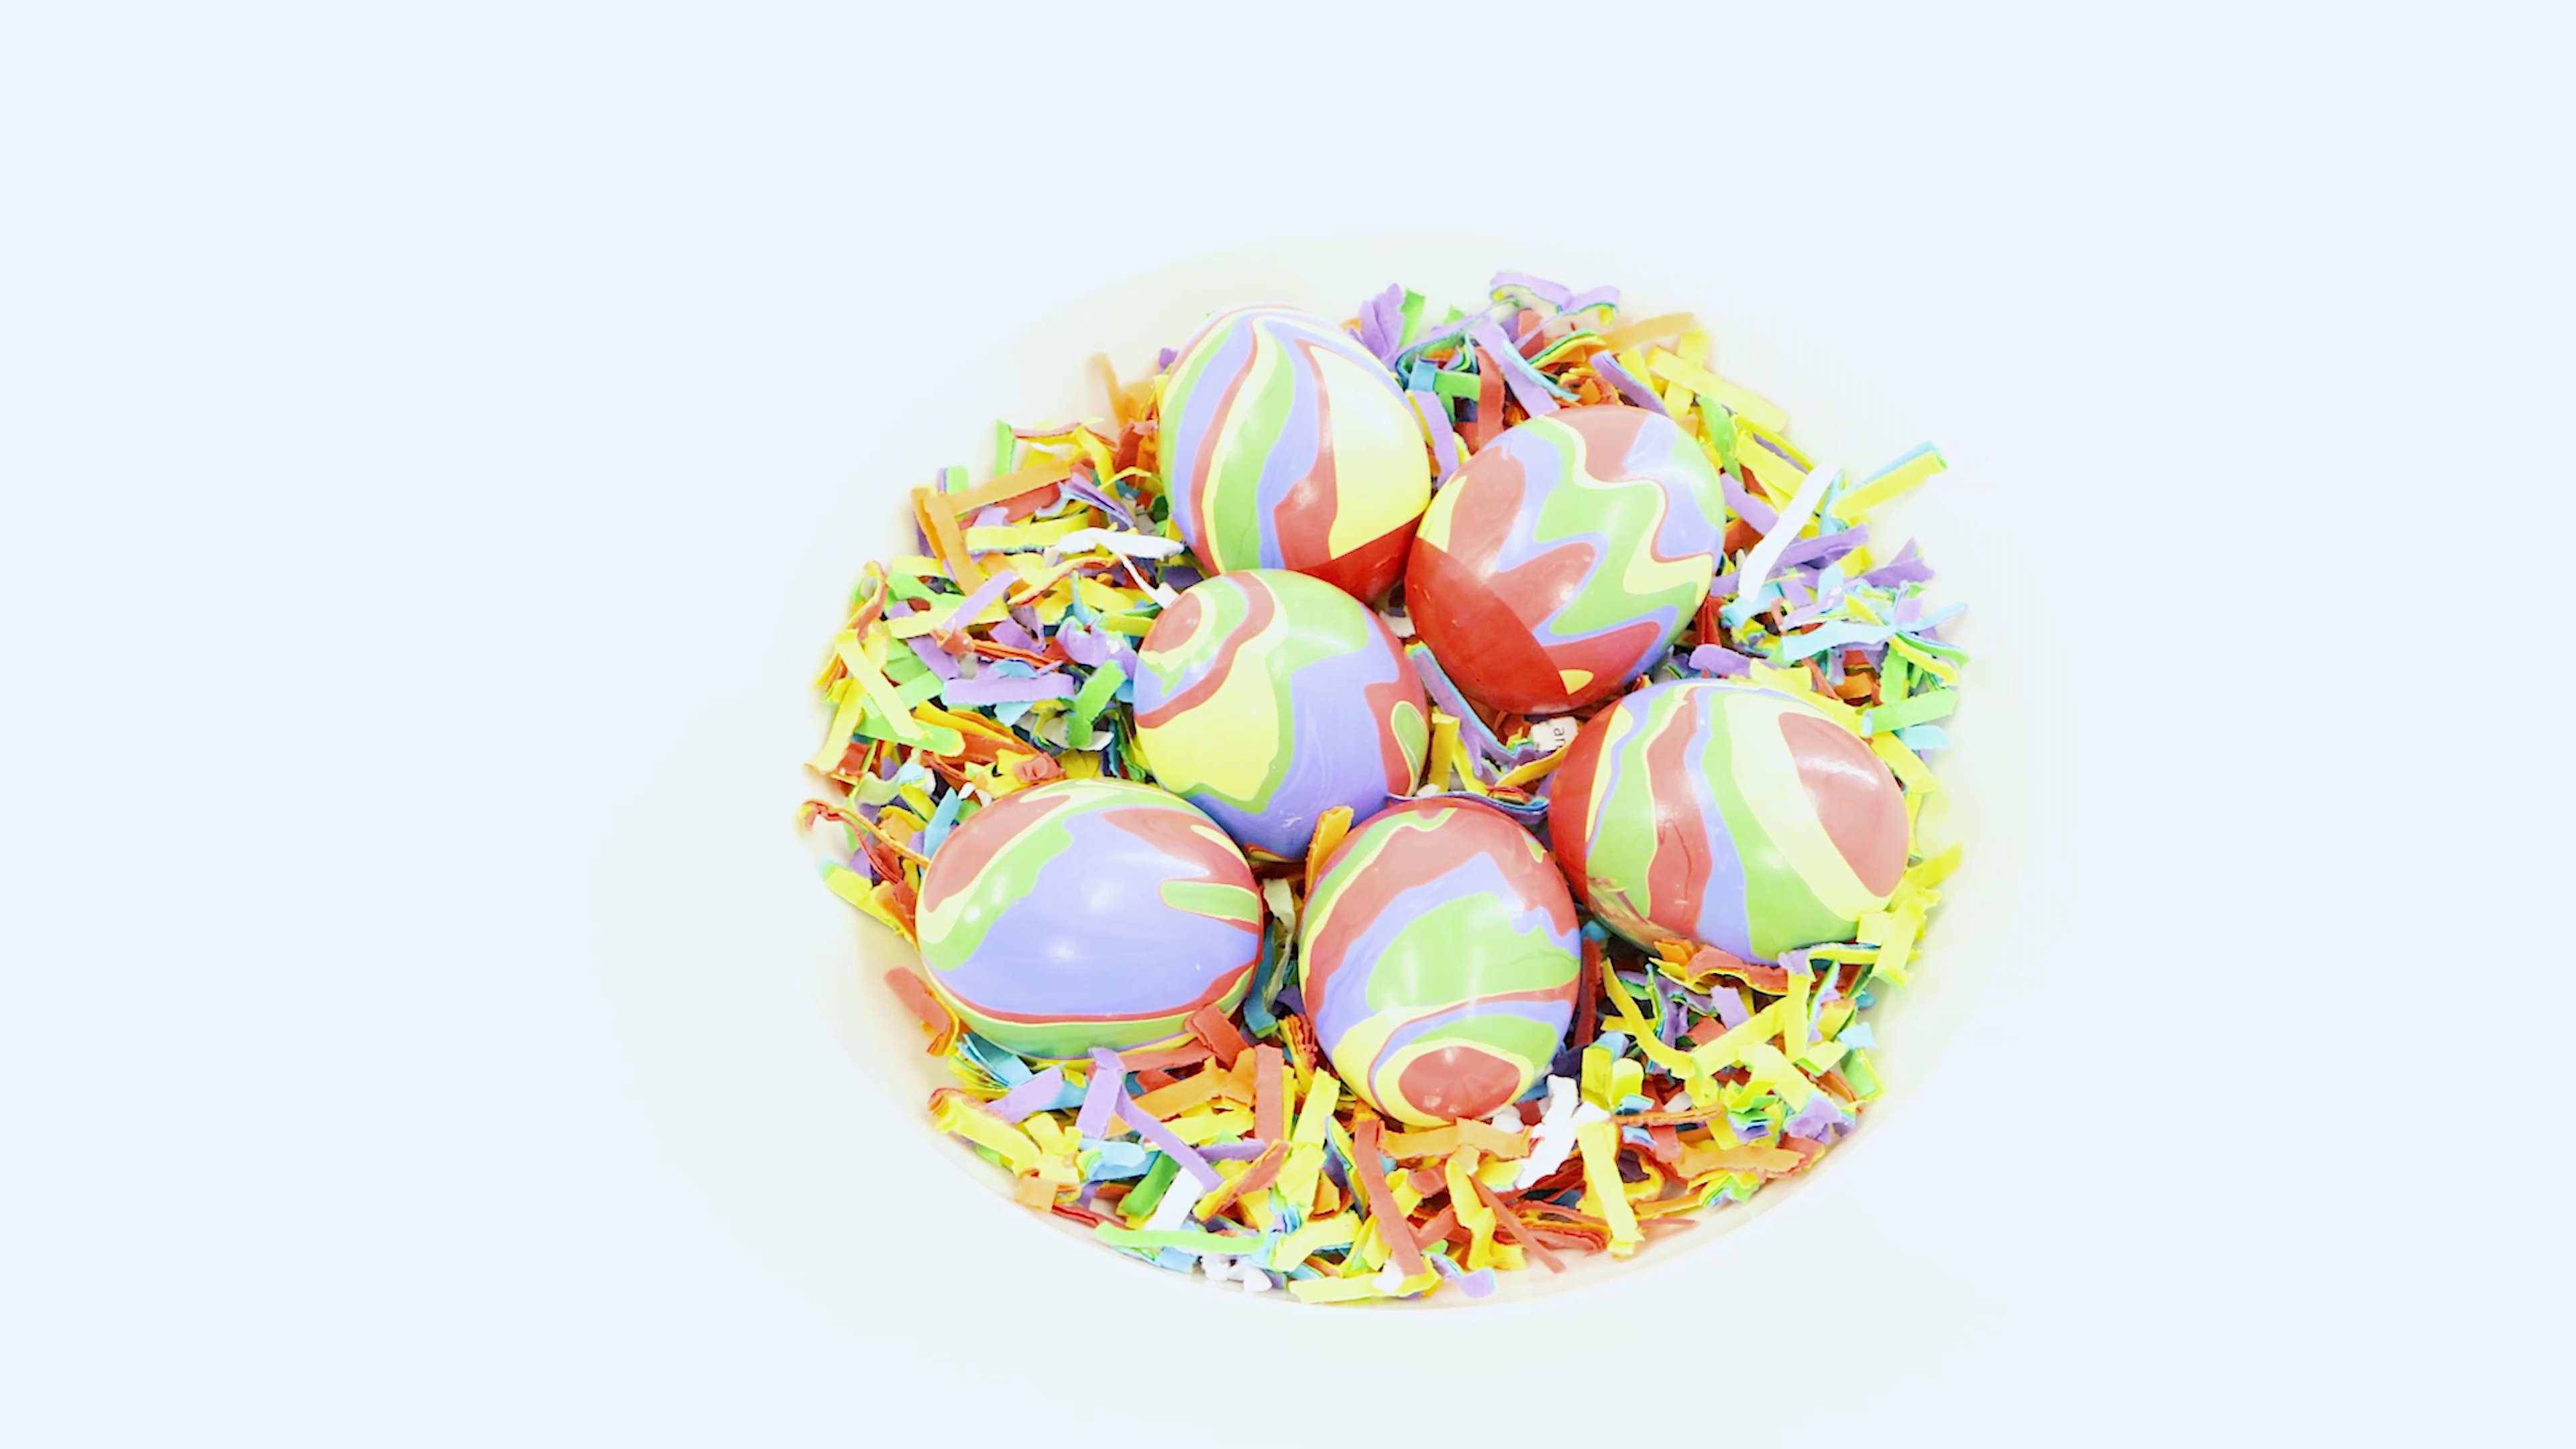
Change up tradition by trying your hand at pour painting Easter eggs! Grab some plastic eggs or some hard-boiled eggs, (if you’re only needing them for a short time) and get pouring!
What you'll need:
-
- Pack of plastic eggs or hard-boiled eggs
-
- Acrylic paint (we used our 6pc set)
-
- Acrylic flow medium
-
- Cups to mix
-
- Palette knife
We’ve created a lesson to show you how you can create your own pouring paint Easter eggs, you can check it out here.
Tip: If you’re working alongside little artists, grab an ice-cream container or an old plastic container and try pouring the paints into the container, then gently roll the eggs around until they’re covered in paints.
15. Speckled egg Easter wreath
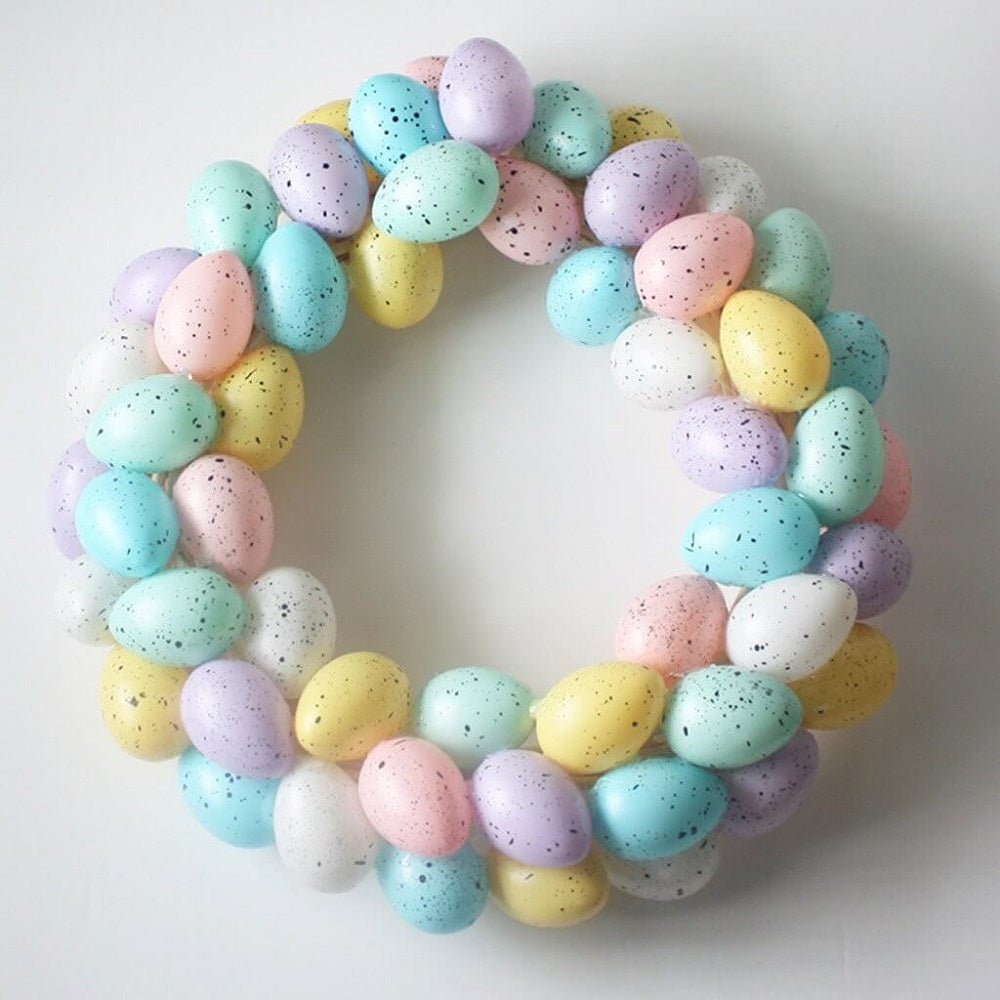
Bring in the Easter season with this fun DIY Easter project and create a spring time wreath.
Grab some plastic store-bought eggs, a wreath, some hot glue, paints and a bit of creativity to create your own speckled egg Easter project.
What you need:
-
- Plastic eggs
-
- An old tooth brush
-
- Your choice of acrylic paint colours
-
- Wreath
-
- Hot glue
-
- Ribbon to hang
Lay out some newspaper or a drop sheet for this activity, as there might be a bit of mess here. Group your Easter eggs together (it will be easier to paint a group rather than one at a time), then dip your tooth brush into your choice of paint colour. Then, using your thumb, pull the bristles back and forward to create a spray of colour. Wipe the tooth brush clean with paper towel before moving onto the next colour. Once you’re happy, leave them to dry before securing the eggs onto the wreath with hot glue.
Finish the project by tying a ribbon at the top of the wreath, then it’s ready to hang!
16. Potato stamps
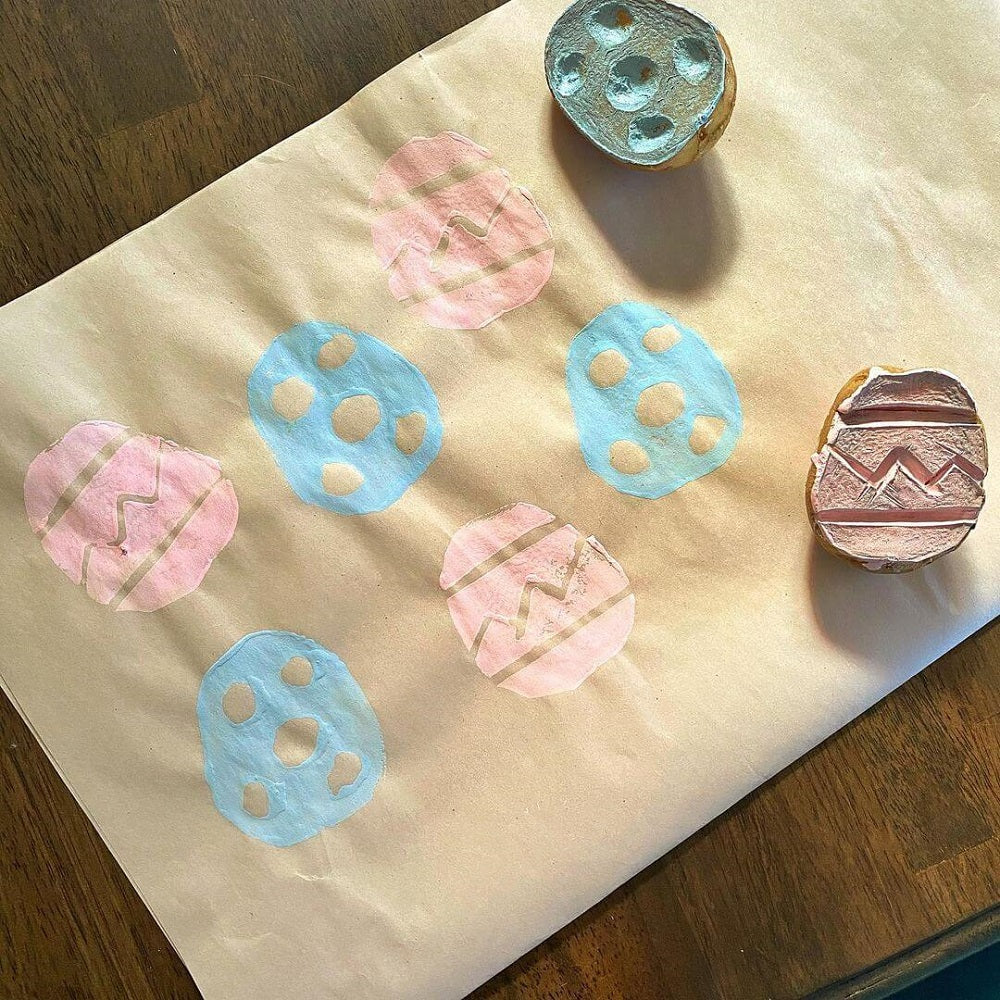
These potato stamps are a quick and easy Easter craft idea. Swap out the acrylic paint for fabric paint and make a themed table cloth or use paints and create your own Easter wrapping paper, or just have some fun creating with your little artist, using up left-over spuds.
What you need:
-
- Potatoes
-
- Knife
-
- Spoon
-
- Paper or plain white table cloth
-
- Your choice of acrylic paint or fabric paint colours
Cut a potato in half to create your stamp, then use a knife to carve out your shapes. You can use a tea spoon to remove the potato for a polka dot effect like this idea, or create a grid shape with a knife too. Once you have your design, you and your little artist can get stamping!
Dip the potato into the paint and then stamp them down to make your Easter egg print. Have fun with different colours, and positions of the design, then let your piece dry!
17. Paper mâché Easter baskets

Store (or stash) your Easter eggs in one of these paper mâché Easter baskets! These baskets are great fun to make with your little ones and they’ll love being able to pop their eggs in it afterwards. Or create one before heading out to an Easter egg scavenger hunt.
What you need:
-
- Paper mâché mix
-
- A balloon
-
- Poster paint (brown and yellow)
-
- Paint brushes
-
- Coloured paper
-
- Feathers
-
- Googly eyes
For this easy Easter craft idea, mix up the paper mâché mix then blow up a balloon for the basket. Spread the paper mâché mix on the top of the balloon so the neck is facing upwards. Hint: it’s handy to mark out on the balloon, where the basket will end so you’ll have a curved line for the basket.
Once the paper mâché is dry, pop the balloon and remove the rubbish, then your basket is ready for painting! Paint each basket the colour you’re after, then leave the paint to dry. Once dry, add your decorations for the face! Glue on googly eyes, felt shapes or paper. Or if you’re stuck for time, grab a marker to dot the eyes, then you’re all done!
18. Watercolour bunnies
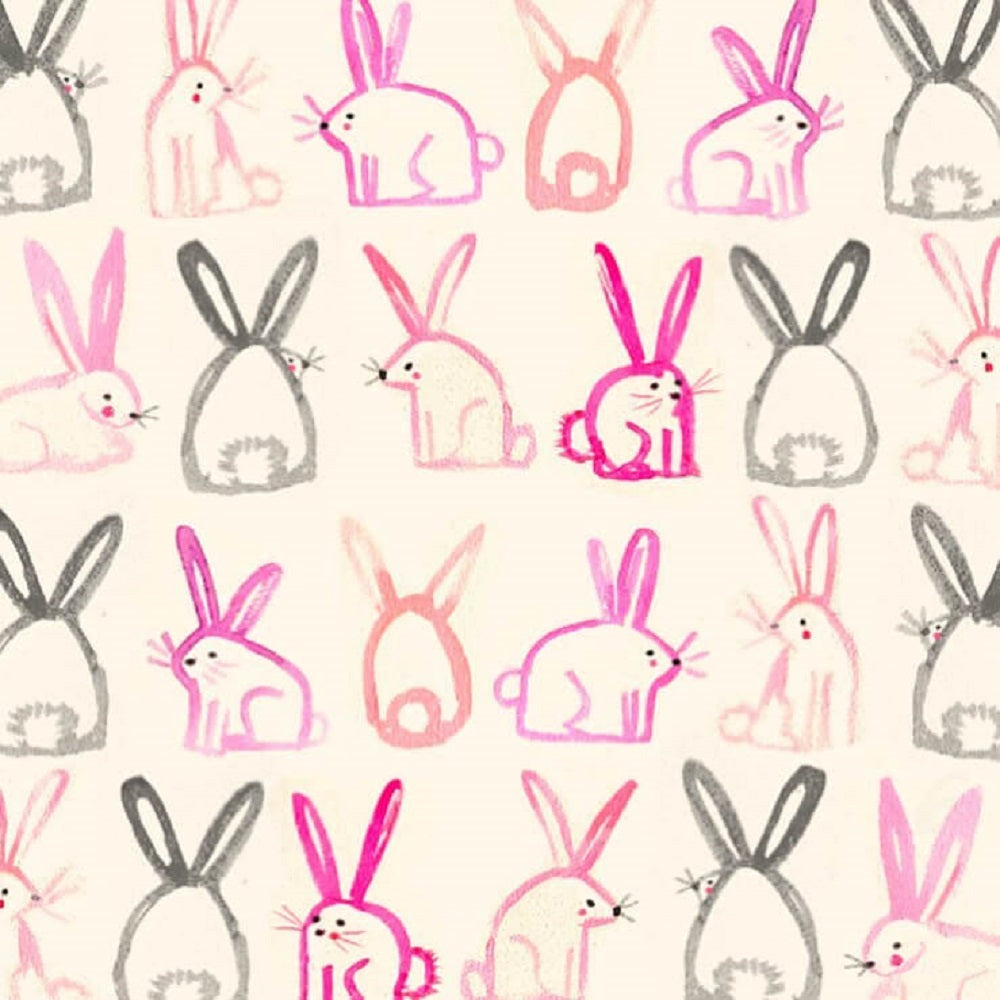
We’re digging this adorable bunny print. This would be great for Easter napkins using fabric paints or fabric markers, or even for fun wrapping paper or an Easter card. It’s so cute, we reckon that you could get away with using this DIY Easter project almost all year round! Let’s hop to it.
What you need:
-
- Graphite pencils
-
- Your choice of fabric paints, fabric markers or watercolour paint
-
- Paint brushes
-
- Cardboard or linen napkins
Lightly sketch your bunny design using a graphite pencil then pick up the watercolours, fabric markers or fabric paints and add some colour! Leave your finished piece to dry and then it’s ready to use!
19. Air dry clay Easter eggs

For Easter eggs that aren’t as naughty as the chocolate ones, this DIY Easter project has your back. Have fun creating these Easter eggs from air dry clay then grab the paint brushes out and have a whole bunch of fun painting your own designs.
What you need:
-
- Air dry clay
-
- Your choice of acrylic paint colours
-
- Paint brushes
To try your hand at this project, check out our step by step lesson here, where we’ll show you everything you need to create your own air dry clay Easter eggs.
20. Abstract style eggs
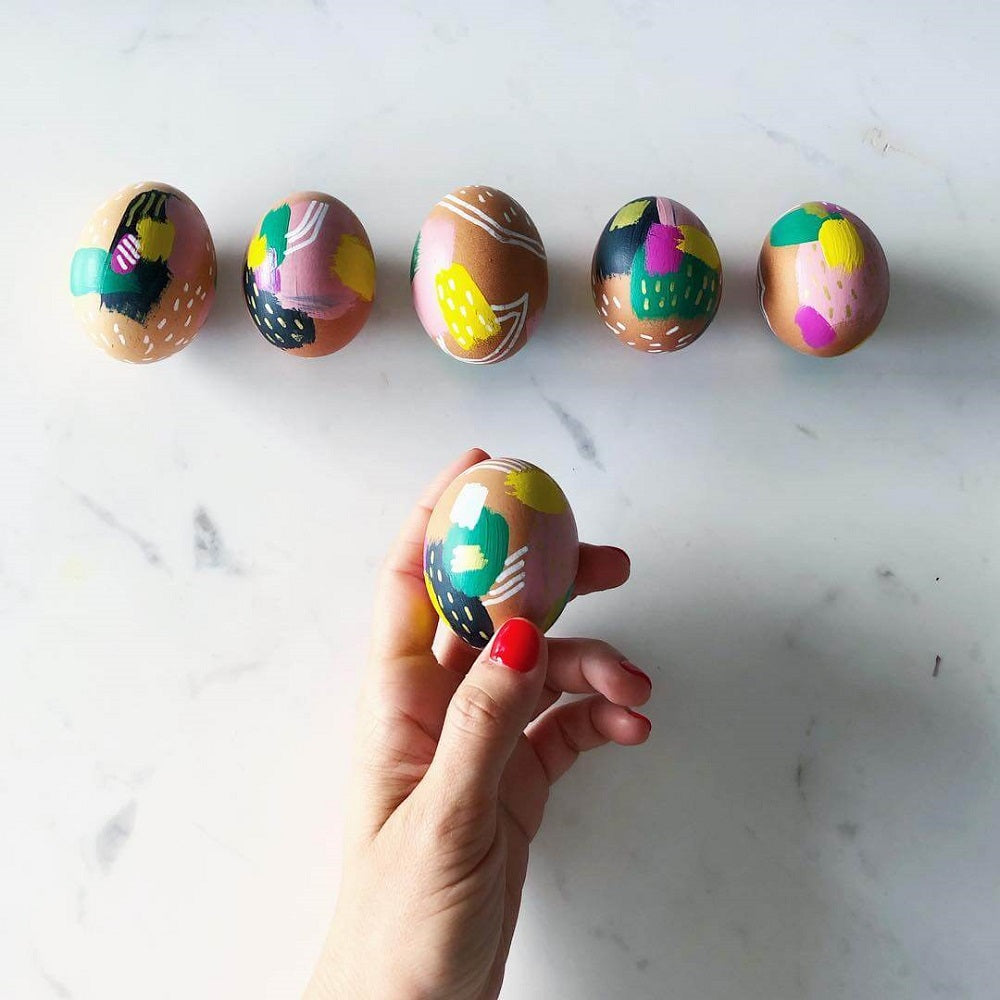
For a modern take on an Easter tradition, jazz up your style and try adding fun abstract splashes and prints like this DIY Easter project.
What you need:
-
- Eggs
-
- Your choice of acrylic paints
-
- Paint brushes
Whether you add splotches, squares, lines or spots, let creativity take over and add an abstract touch to your eggs. If you’re using hard boiled eggs, use an egg cup holder to keep the egg steady as you paint around it. This will make it easier to spin and paint around the egg, plus it won’t spoil your final work!
21. Easter vases
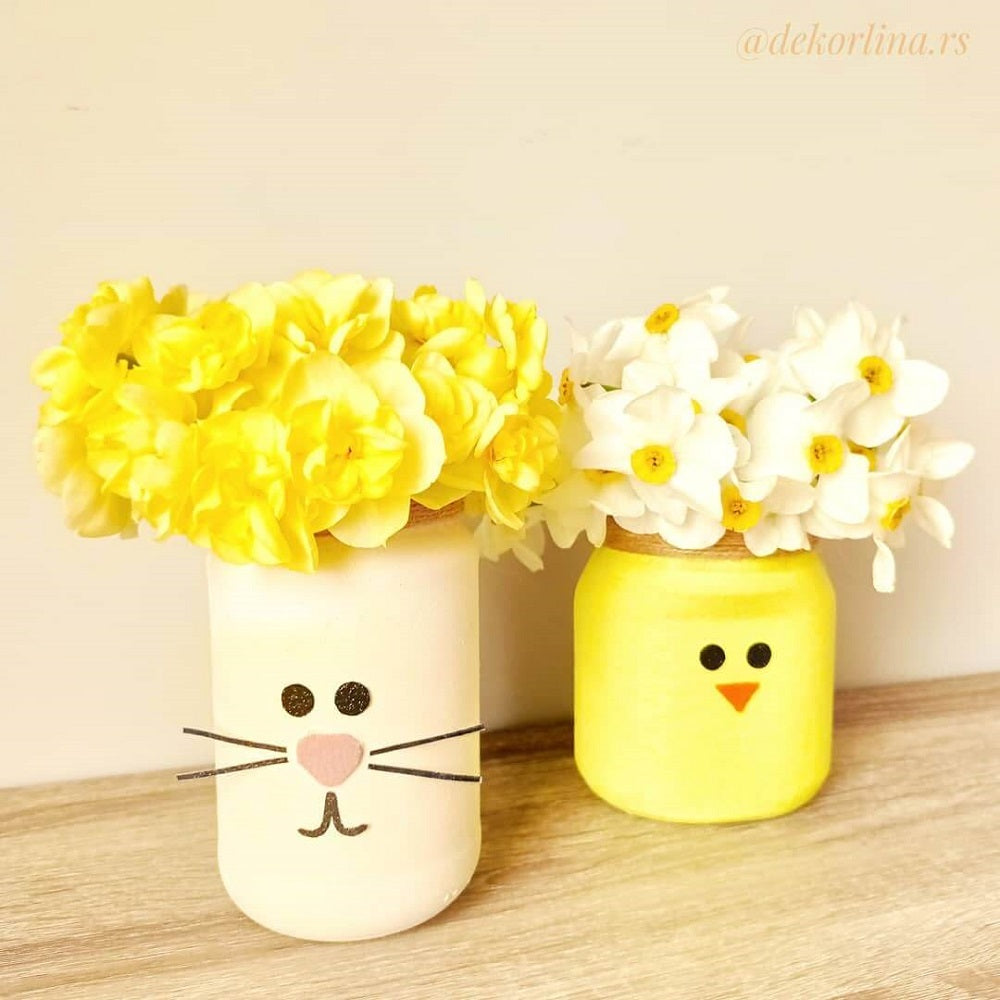
Brighten any room in a seasonal way with these fun Easter vases. Choose to pop in real flowers from the garden, faux flowers or an Easter bouquet and have fun getting crafty with your little creators along the way.
What you need:
-
- An old mason jar
-
- Yellow and white poster paint
-
- Sponge or brush to apply paint
-
- Black marker
-
- Buttons, beads or felt for the face
-
- Twine or ribbon to finish
For this DIY Easter project, start by painting your mason jar with your choice of colour using either a sponge or a brush to apply the paint. This idea has used yellow for the chicken and a white for the bunny. Once dry, apply your beads, buttons or felt to create the face. If you’re running out of time, you can draw on a face or eyes with a marker. Then add twine or a ribbon to finish your project before placing your fresh blooms into the vase!
22. Clay bunny basket
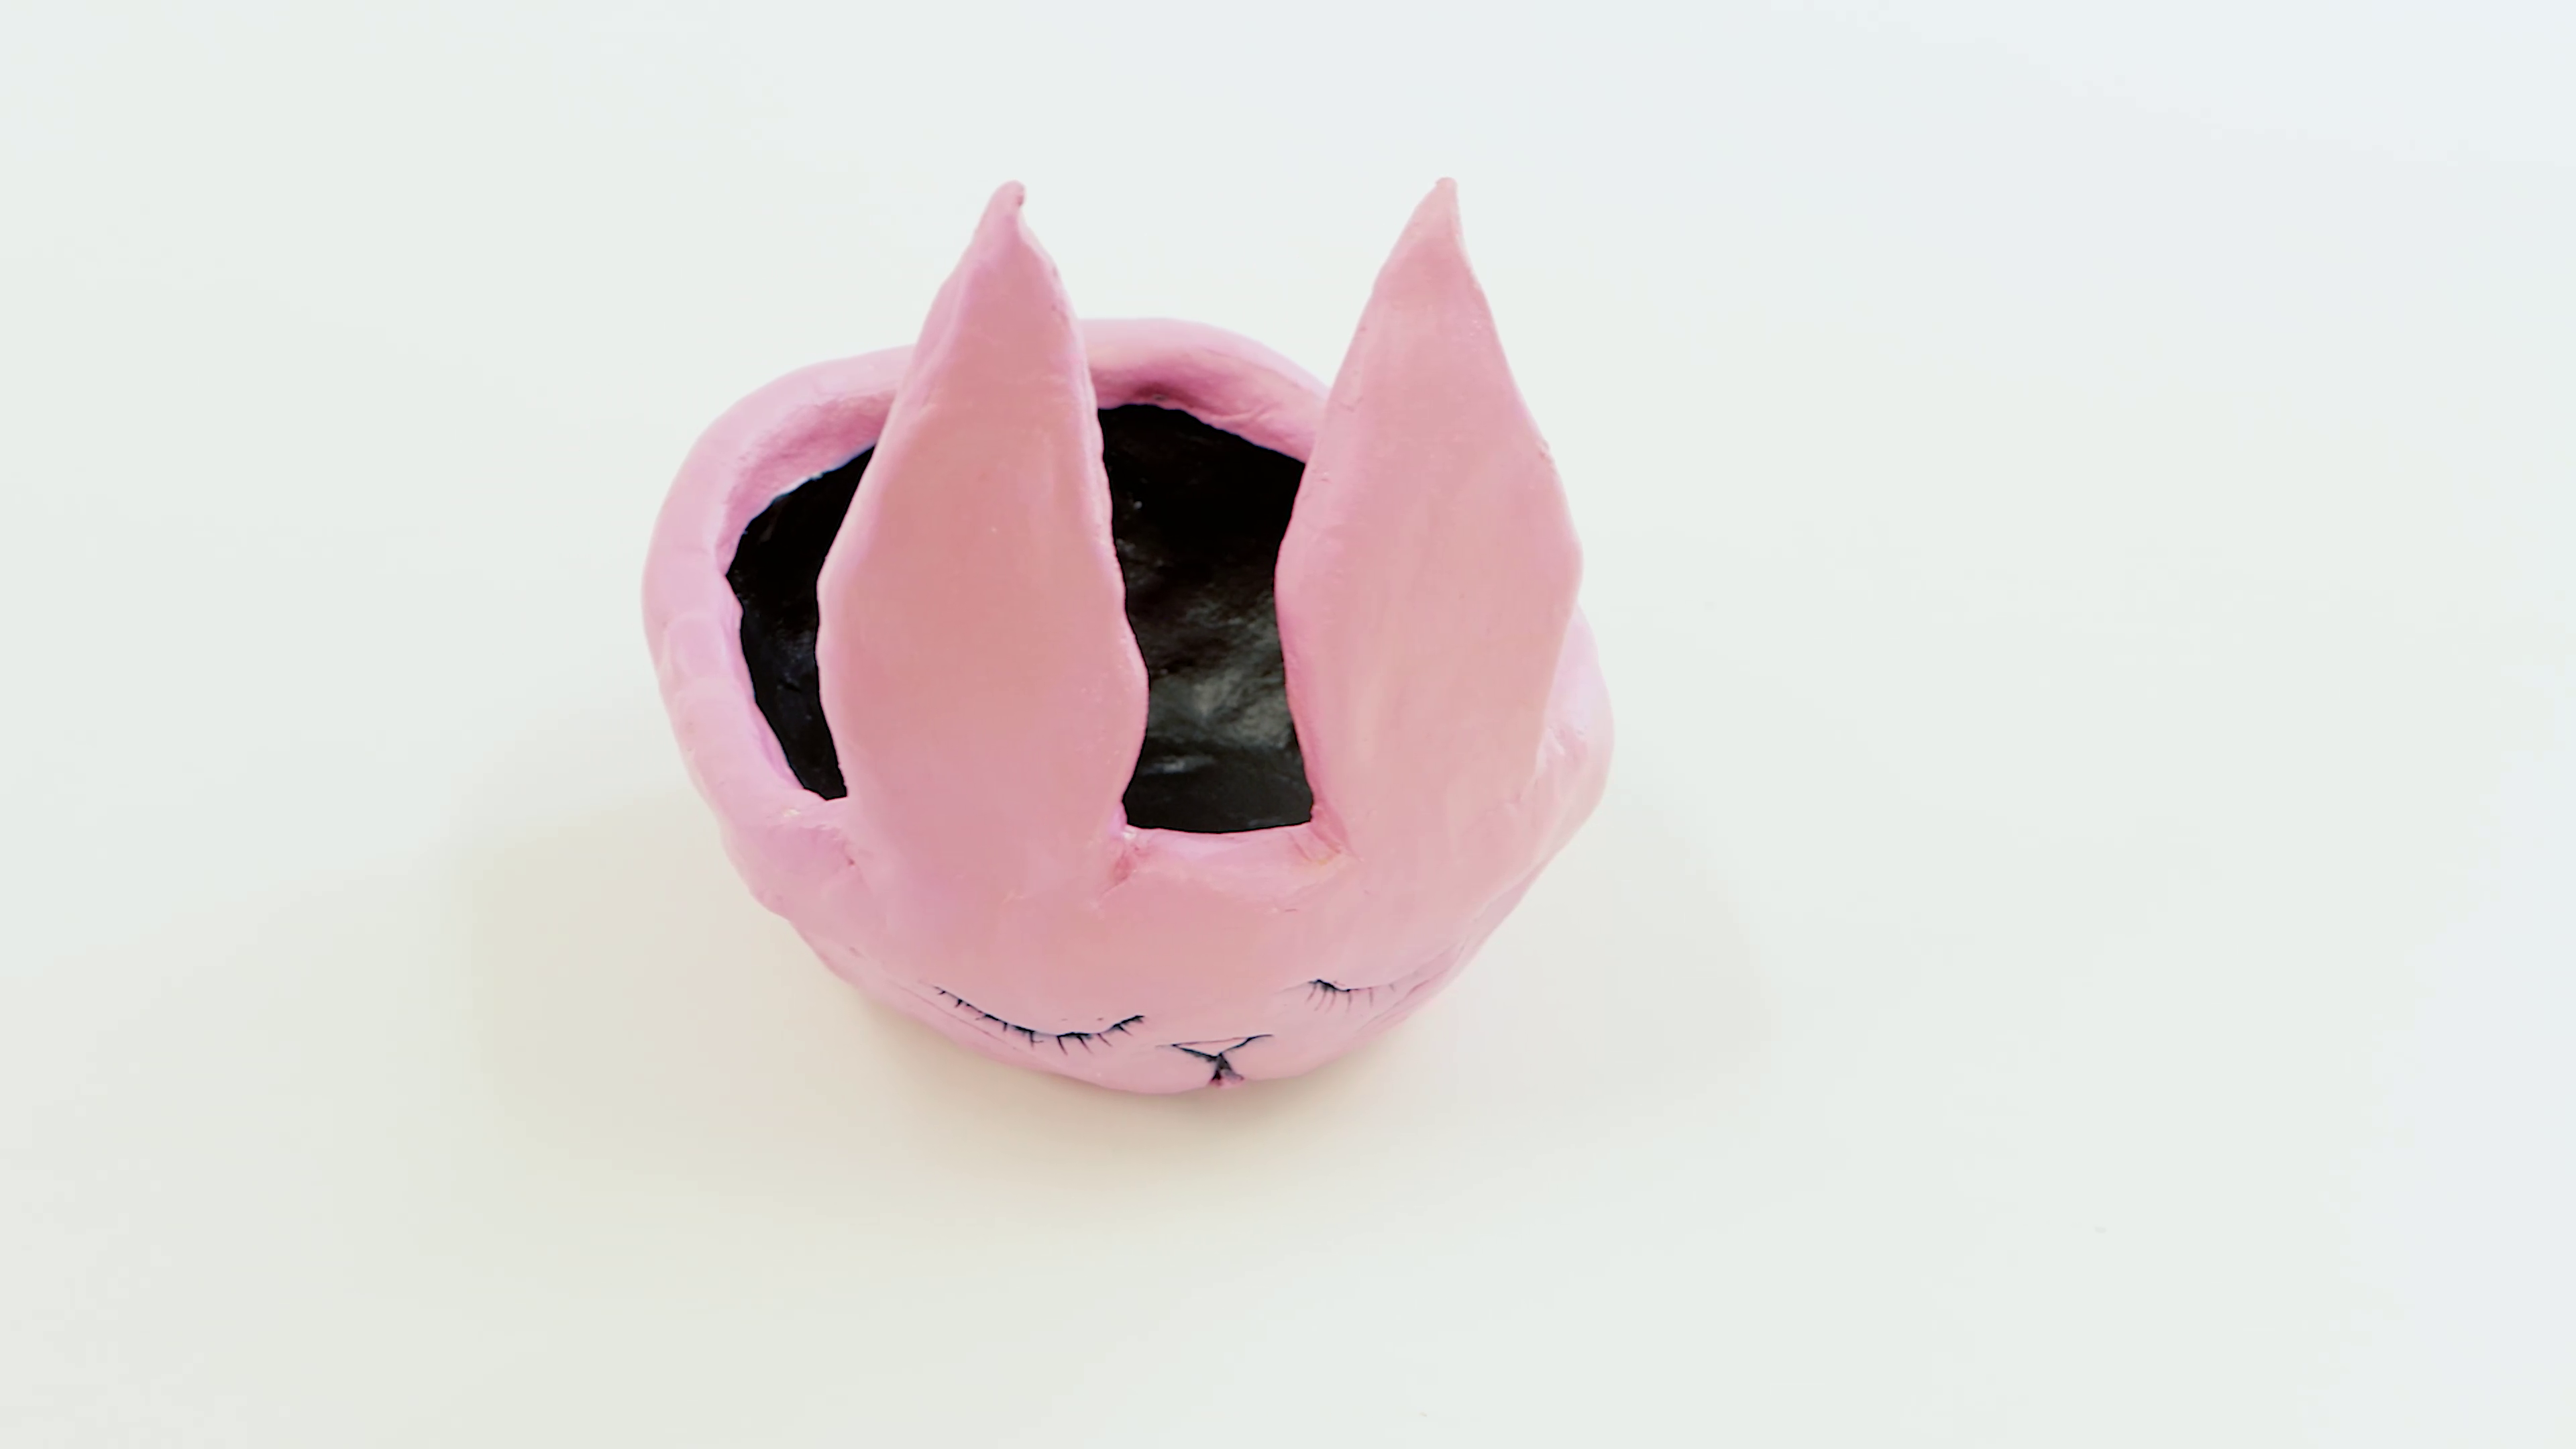
Store your Easter treats in this clay basket or hide them for later! This clay bunny basket is super fun to make over the Easter break, try it for yourself with our step-by-step project here.
What you’ll need:
-
- Air dry clay
-
- Acrylic paint (Yellow Ochre, Titanium White and Brilliant Red)
-
- A flat, taklon paint brush
-
- Palette knife
-
- A plastic palette as a work surface
One of the fun parts of this project is mixing the colours to create your pink rabbit! Feel free to follow along or grab your own colours and add some artistic flair to this project.
23. Dried flowers in clay
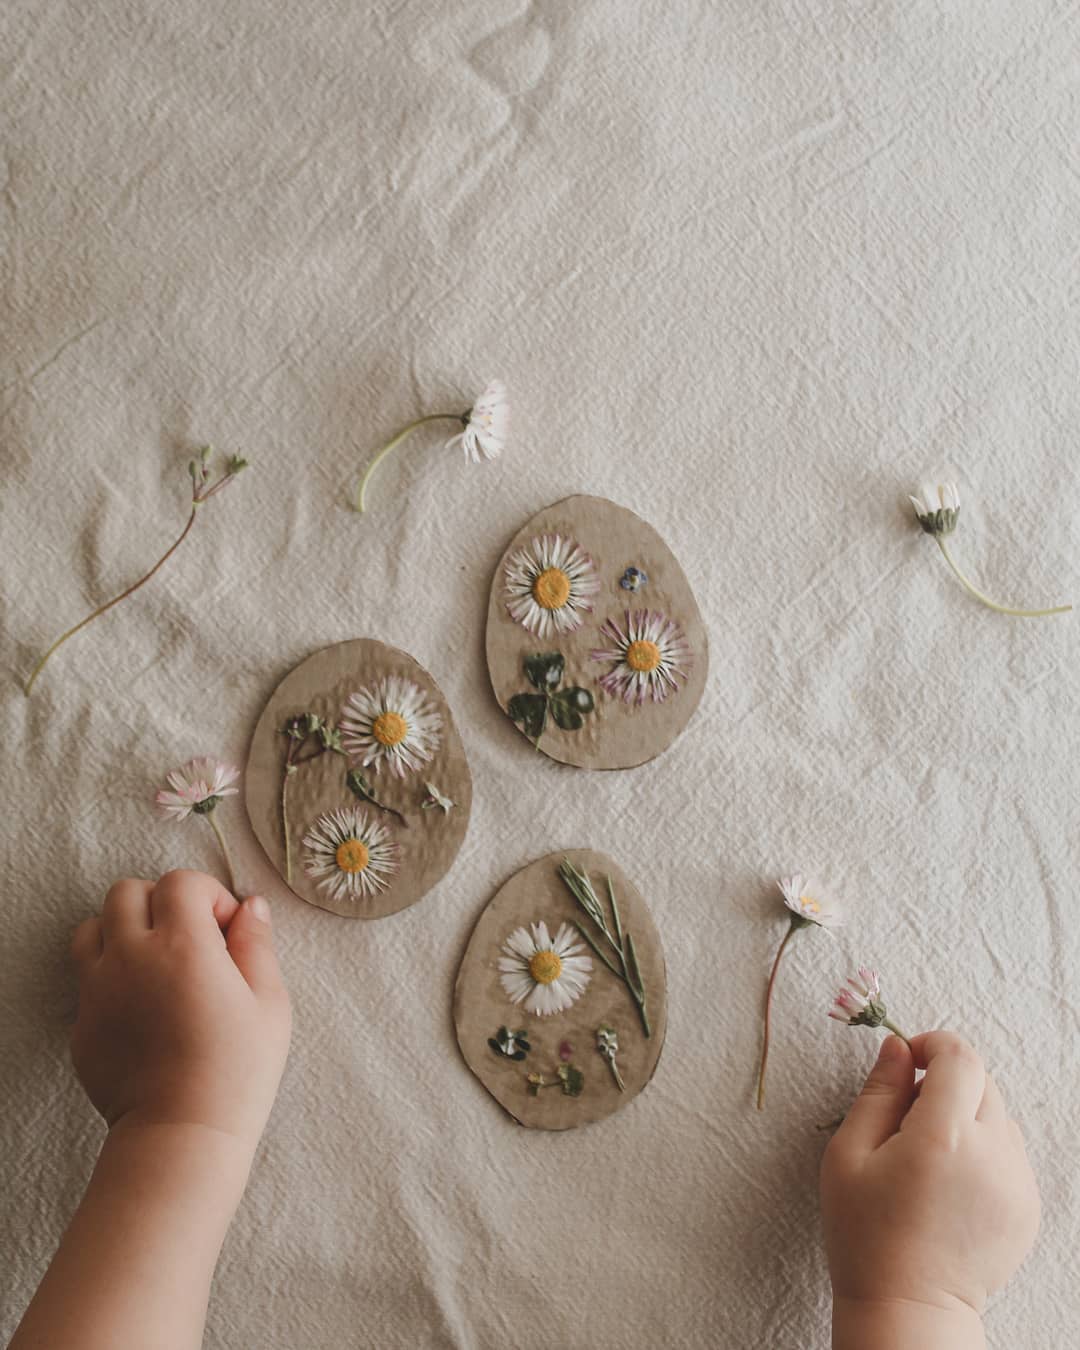
Roll out some clay and create unique Easter decorations with this DIY Easter project idea.
What you need:
-
- Polymer clay
-
- Your choice of dried flowers
-
- Rolling pin or mason jar
-
- Cookie cutter
-
- Knife
-
- A pencil or paintbrush
-
- Ribbon or thread to hang
For this easy Easter craft idea, grab a ball of white polymer clay, a rolling pin (or a mason jar, if you don’t have a rolling pin handy), and begin by rolling the clay out to create a shape. Cookie cutters also work wonders if you’re wanting a particular shape like a heart, circle, triangle or square, press the cutter firmly onto the clay to make your shape. Then use a knife to remove any excess clay from around the cookie cutter. Once you have your shape ready, press the flowers into the clay with your hands and then press them into the clay a little further with a rolling pin or mason jar, to keep them in place. Using a pencil or the end of a paintbrush, add a hole in the clay so you can hang your decoration once it’s been baked.
Remember your flowers will darken once they go in the oven so expect a little colour to be lost, or remove the flowers before baking, this way you’ll still have their imprint. Then bake as directed.
24. Toilet paper roll bunnies and chickens
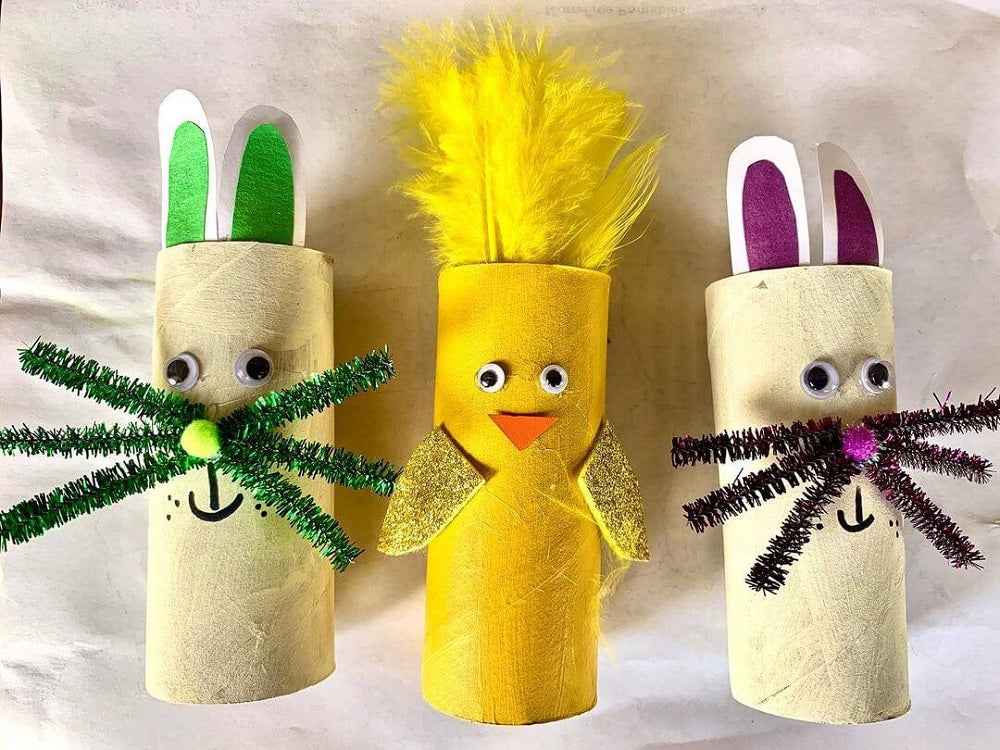
For an easy Easter craft idea to make while the little ones are waiting for the Easter bunny to visit, give this toilet paper roll idea a go and use up those left-over bits from around the house.
What you need:
-
- Toilet paper rolls
-
- Yellow and white poster paint
-
- Paint brushes
-
- Pipe cleaners
-
- Googly eyes
-
- Pom poms
-
- Scissors
-
- Craft glue
-
- Black marker
-
- Coloured paper
-
- Feathers
Grab your poster paint and add a touch of paint to each of the toilet rolls. Once dry, it’s time for decorating! Add some googly eyes, feathers and start adding the faces with a marker. Cut out the ears for the bunny, the bird’s beak and feathers, then glue to attach, all done!
25. Painted Bunny
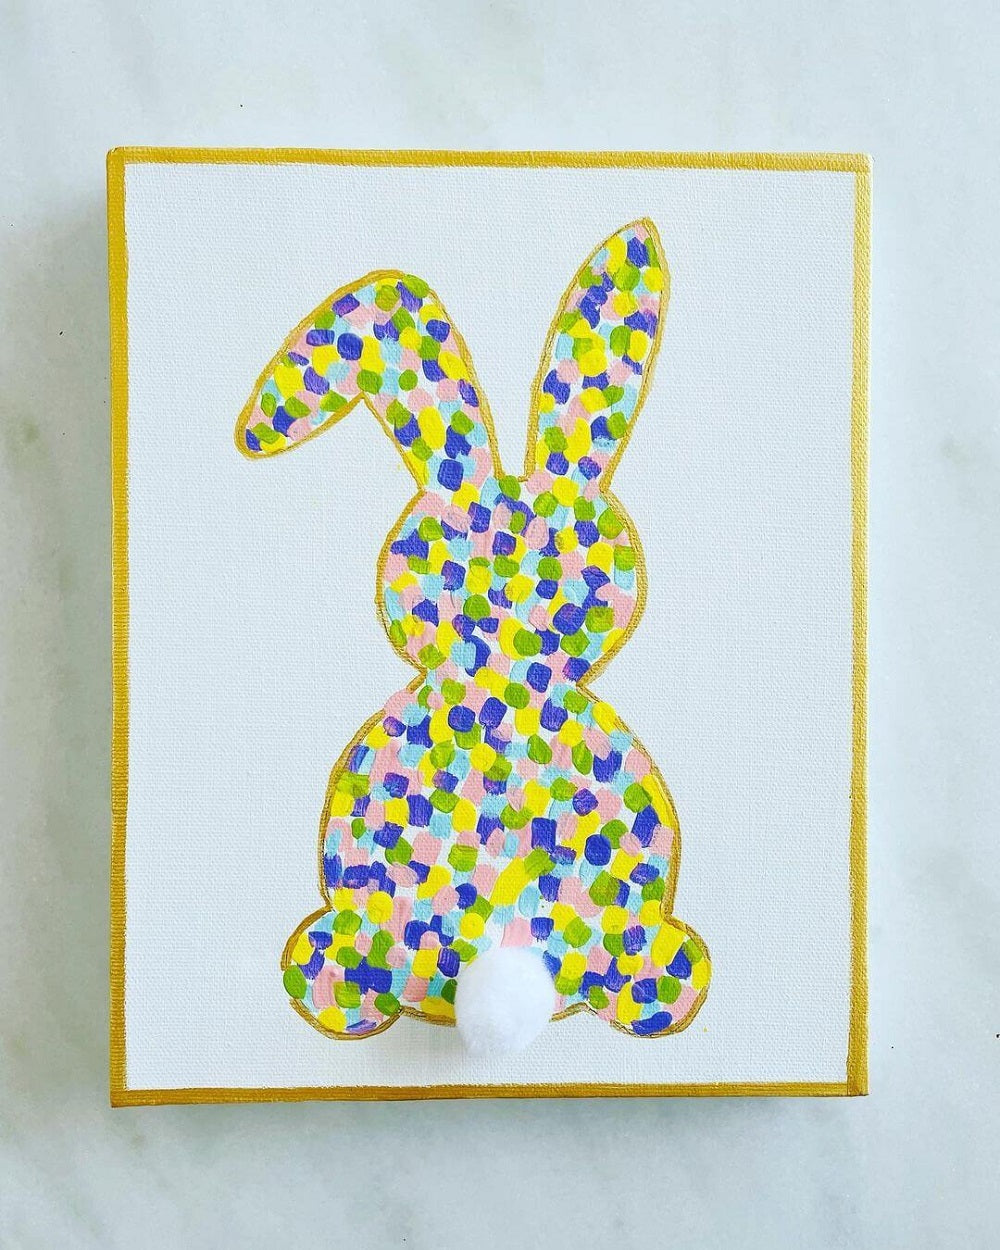
We're loving this colourful painted bunny. This easy DIY project is a great way to add a touch of Easter to guest bedrooms and put that extra spring in your step, plus it's a chance to get the paint brushes out and have some fun too!
What you need:
-
- Canvas
-
- Graphite pencil
-
- Your choice of acrylic paint
-
- Paint brushes
-
- Craft glue
-
- Cotton bud
Start by drawing an outline of your bunny, you can use tracing paper and trace an image before transferring it to the canvas, or try free hand. Once you're happy with your creation, reach for the paints and add a splash of colour. Add a gold border like this idea or let your imagination run wild. Then leave the paint to dry, before picking up some craft glue to secure the cotton bud for the bunny's tail. Then it's ready to hang!
Have you got everything you need? Top up your creative tools and check out our kid’s range or craft range.


