


If you’ve ever wanted to create intricate, repeating patterns in polymer clay, you’re in the right blog – let’s chat about how to make a polymer clay cane! These little logs of clay magic let you slice off identical designs over and over again, perfect for DIY jewellery, sculpture details, buttons, pins, and more. Whether you’re a total newbie or just need a refresher, this guide will take you through the basics of making your own polymer clay canes. Let’s get rolling (literally)!
What are polymer clay canes?
A clay cane is a rolled-up log of polymer clay that contains a pattern or design running all the way through it. The beauty of canes? No matter how many times you slice it, the pattern stays the same! Think of it like a stick of rock candy—cut anywhere, and you’ll see the same design inside.
Polymer clay canes are used for all sorts of things including making beads, earrings, and pendants, adding details to sculptures, or even jazzing up a simple mug. Once you’ve got the hang of it, you can experiment with different patterns and techniques to make your creations truly unique.
What you’ll need
Before we dive into the fun part, here’s what you’ll need:
- Mont Marte Polymer Clay – pick a variety of your fave colours to create your design. Metallic shades add a nice shimmer!
- Roller or Clay Press – For rolling your clay into even sheets.
- Craft Knife – To get clean, crisp slices from your cane.
- Work Surface – A smooth, non-stick surface like an Easy Clean Palette or glass cutting board.
- Baking Tray & Oven – To cure your finished pieces once you’re done slicing.
Got everything? Time to get creative!
Step 1: How to condition polymer clay
Before you start building your cane, you’ll need to condition your polymer clay. This just means warming it up so it’s soft and easy to shape. Take each colour and knead it between your fingers or roll it through a clay press a few times until it’s nice and pliable. The heat from your hands and friction of rolling helps to warm up the clay so it’s more pliable.
This step is a must! Trust us, skipping it will make your cane crack or crumble later on, which we recommend avoiding so your shapes stay consistent.
Step 2: Types of polymer clay canes
There are loads of different types of canes you can make, but here are some ideas to start with:
- Bullseye Cane – A simple but effective cane! Roll a log of one colour, wrap it in a thin sheet of another colour, and roll it up. Keep it simple with two colours or keep layering shades for a more complex design.
- Striped Cane – Layer different coloured sheets, stack them up, and roll them into a log for a fun striped effect. Use loads of colours for a rainbow effect or keep it classic with one to two shades layered over and over.
- Spiral Cane – This is similar to a bullseye cane, but instead of wrapping evenly, you roll it up into a spiral like a cinnamon bun.
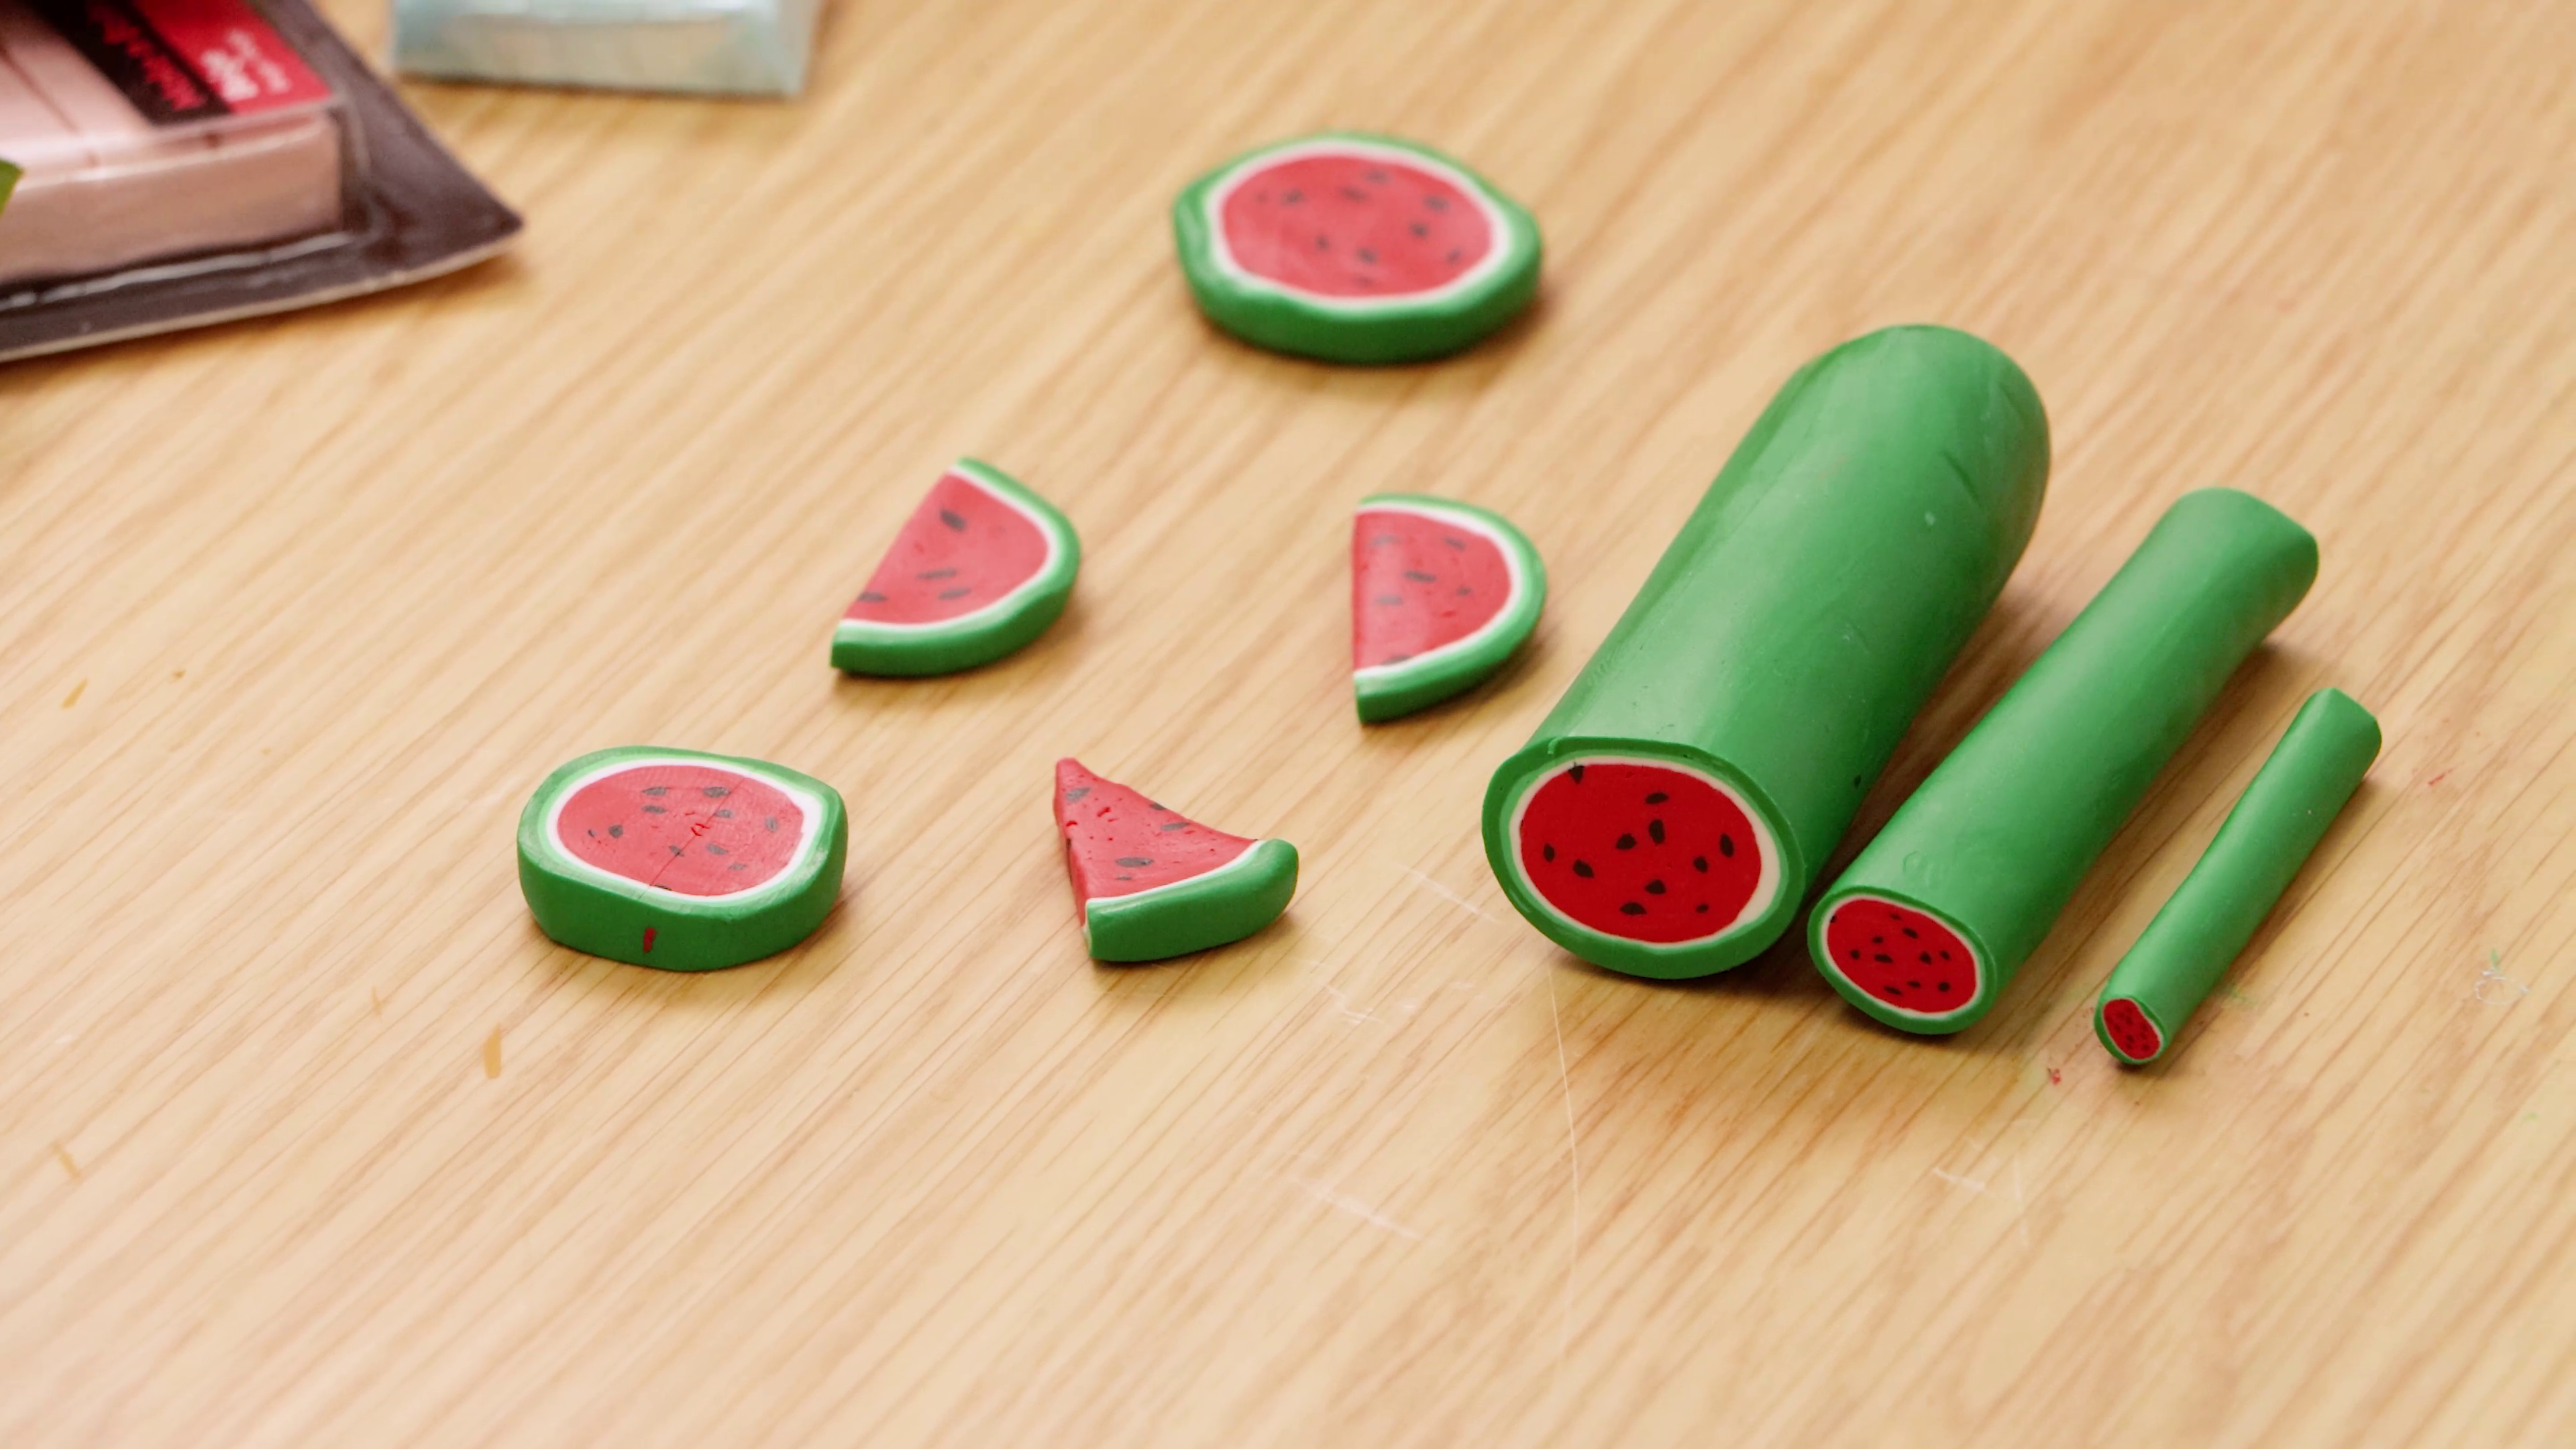
- Watermelon Cane – A little more complex if you’re up for a challenge! Involves making cuts and layering colours – see below for the steps!
For beginners, the bullseye cane is a great place to start. Once you’ve got the technique down, you can get fancy with flower, leaf, or even face designs!
Step 3: Making polymer canes
Once you’ve chosen your design, it’s time to put it together. Once you’ve tried a couple of the easier techniques above, have a go at making a watermelon with us.
Start by rolling conditioned pinky-red polymer clay into a triangular prism shape. Next create a slice through the shape and use a clay tool to make an ident inside the cut area. Prepare some black clay (this will be your watermelon seeds) and roll it into a thin tube before placing in inside the indent and closing the pink shape back up.
Repeat this process over and over until you’ve added enough tubes of black to create the amount of seeds you want. Cut the clay where you want to add a tube, indent, and add in the tube of black clay. Once you’re happy with the seed placement, make sure the pink watermelon triangle is sealed up with no creases, before beginning to slowly stretch it out to a longer size. Be gentle and patient, working the clay slowly to avoid tearing it as you pull it out.
Once it’s about 60cm, cut it in half, lay the triangles next to each other, and then push together. It creates a half-circle kind of shape! Cut in half again, and push the two pairs of triangles together – now it’s a circle. Make sure there’s no air pockets as you press the shapes together, sealing up and gaps. The detailed parts are done – phew.
Condense the circle shape again by pushing the polymer clay on both ends while gently rolling – this will make a tube of your watermelon! Roll out some white, yellow, light green, and dark green clay into thin sheets. Starting with the white, roll a layer of the sheet around the watermelon and cut off any excess. Repeat the process with the yellow.
Roll the light green and dark green sheets together for a marbled effect before adding as another layer to your watermelon. Cut off excess once more and roll the clay so there are no air bubbles. You cane has been made! You could start slicing before reducing for larger designs or follow step 4 to make it a thinner cane.
Step 4: Rolling out polymer clay
Once your cane is assembled, you’ll likely want to reduce it—this means rolling it out to make it smaller and more compact while keeping the pattern intact.
Start by gently rolling your cane back and forth, applying even pressure. Use your fingers to stretch and lengthen it gradually. Take your time—you don’t want to squish your design, or it may distort! Keep rolling until your cane is the desired size for slicing.
Step 5: How to cut polymer clay canes
Now for the satisfying part—slicing! Using a sharp blade, carefully cut thin slices from your cane. If you’re adding them to beads or another project, place them where you want them and press lightly to adhere.
Once your slices are arranged, bake them according to packaging instructions (usually around 110-130°C for 15-30 minutes, depending on clay thickness). Let them cool before handling.
Step 6: How to use polymer clay canes
Wondering what to do with your finished canes? Here are a few ideas:
- Make Beads: Roll your cane slices into small beads, poke a hole through them, and bake! Ideal for those abstract designs.
- DIY Jewellery: Press cane slices onto pendants, rings, pin backings, or loop onto earrings for wearable artwork.
- Cover Objects: Use cane slices to decorate pot plants, jars, or even phone cases!
- Make Mini Artworks: Turn slices into tiny works of art for keychains or fridge magnets.
The possibilities are endless—so don’t be afraid to experiment!
Final Tips & Tricks
- If your slices are uneven, chill your cane in the fridge for 15-20 minutes before cutting.
- Try mixing metallic polymer clay with solid colours for a delicate shimmer.
- Keep your blade clean between slices for crisp cuts.
- Store unused cane sections in an airtight container so they don’t dry out.
Now that you know how to make polymer clay canes, it’s time to put your skills to the test! Whether you start with simple bullseye canes or jump straight into the watermelon, there’s so much you can do with this technique.
We want to see what you can create, so #montmarteart or tag us @montmarteart on Instagram or Facebook. We’re excited to see what cane designs you come up with!
Looking for more lessons and techniques? Explore our Tips & Techniques collection, or else browse Projects for your next big idea.
To stay up-to-date with the latest projects, inspo, tips, and tricks, join our Creative Connection community by signing up down below.


